I’m not sure what it is about knitting needles, but I love to buy them.
I AM a knitter, so it’s not just me being weird, (well, maybe it is....who knows?) but I like to buy and try out new needles and then collect the good ones, so that I’ll always have the right ones on hand when I need them for a new project.
I blame my mother. It’s all her fault.
I didn’t inherit my love of knitting needles from her. I don’t have any memory of her knitting, as the last knitting project she worked on was the layette she was working on when she was pregnant with me, more than 43 years ago. She never finished the project. I was the baby from hell with an undiagnosed milk allergy, and she was too busy cleaning up puke to do much more than try to soothe my constant screaming, do lots of laundry, and get through my babyhood without giving in to the urge to flush me down the toilet. Who has time to knit in that circumstance?
She may have lost interest in knitting, but she did sew throughout my childhood (though she’s lost interest in sewing, too. But after doing something for 45 or 50 years, I suppose one is entitled to get a bit tired of it). But she still LOVES to cook, and is very, very good at it.
I’m a decent seamstress and cook well enough, but I picked up knitting on my own. What I did inherit from her was a love of gadgets. She has every cooking and sewing gadget known to man (or women, as the case may be). I can’t tell you how many times during my childhood she excitedly pulled out her most recent kitchen gadget and showed me how it worked.
Yeah, yeah, Mom... Whatever. (Imagine teenage scorn in my tone). To the embarrassment of my future self, I kinda like kitchen gadgets, now too. Though I tend to limit my kitchen gadget acquisition to ones I’ve seen and tried out in Mom’s kitchen first. Unlike her, I have a normal-sized kitchen.
Even as a senior, she’s a bit like a kid that way. And just in case my tone fools anyone, I want everyone to know that I hope to grow up to be just like her. Anyone that’s like a kid in their excitement over the coolness of a new gadget is OK by me.
But, if you hear me say such odd words as Dyaks, Boye, AddiClick, Signature Stillettoes, Brittany, Harmony, Denise, Karbonz, HiyaHiya, ChiaoGoo (really!), Blackthorns, Nova, or Northern Lights, you’ll know that I’m probably trying out a new knitting needle. Or discussing the properties of said knitting needle, and why I need one needle for one kind of yarn, and another needle for some other kind of yarn. I'm feeding my addiction, anyway.
And, as I said, it’s all Mom’s fault.
Really.
08 November 2012
28 October 2012
Merida Dress - Long Version
So …. Halloween 2012.

Another year to go overboard on my daughter’s Halloween costume. But it’s fun for both of us – she gets a great costume, and I get to work on a fun, creative project.
Side note – my original version of this article was nearly 3000 words long. So I’ve created two versions:
So… pick and choose the one you want to read. Or, if you are REALLY dye-hard (pun intended) you can read BOTH! :-)
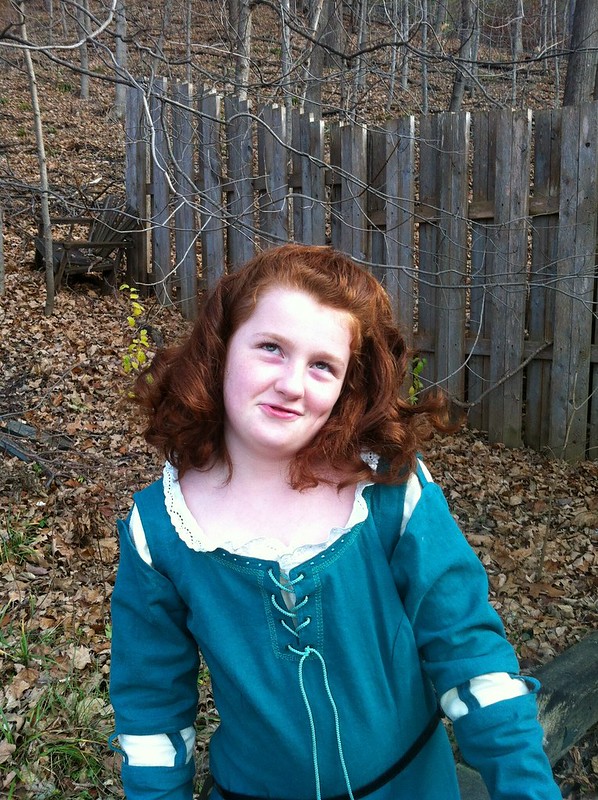
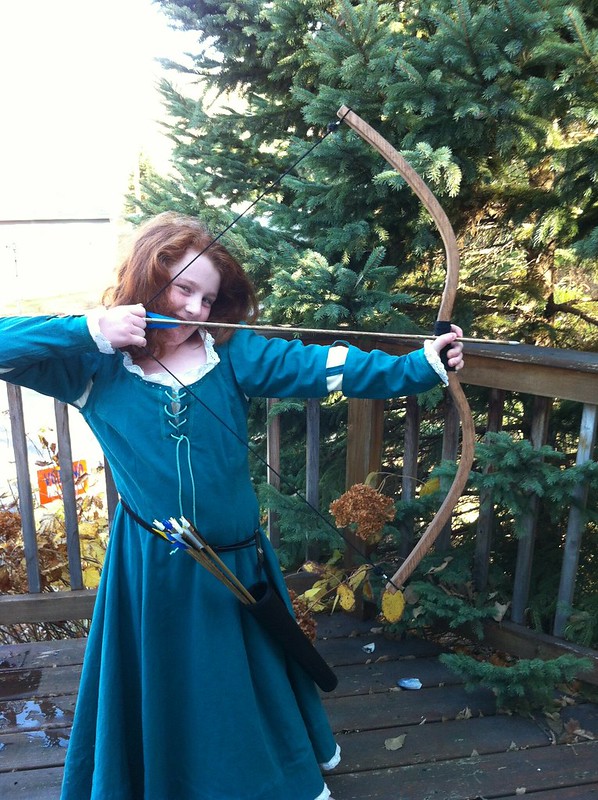
This year, Kivi agreed to be Princess Merida from the Pixar movie Brave. Normally, she picks the costume, though she’s not allowed to change her mind once we start buying what we need for the costume. Then we work together to pick the fabrics and other details. She’s also usually content to let me run with it, which I love. I get to flex my creative muscles.
This year, however, it was my idea that she dress up as Princess Merida, and I suggested it several months before it was released in the theaters. She’s got naturally wavy red hair, so it seemed a natural fit. In the past, Kivi has REFUSED to let me dress her in other traditional red-head costumes like Little Orphan Annie, or Raggedy Ann, so I was pretty excited when she humored me and agreed to be Merida.
Initially she wasn’t really all that enthusiastic. All we had to go on were a few pictures that were published in advance of the movie. She started getting excited when the trailers were released, and then once she saw the movie … well, after that, I didn’t have to convince her. Merida isn’t just a princess (although, that’s certainly an added bonus), but she’s also a badass archer.
Honestly though, I don’t know how much humoring there really was – she squeals in excitement every time she tries on the dress. She also got a fun bow-and-arrow toy out of it, so she’s not complaining.
Merida wears three dresses in the movie:


The Pattern:
After a brief search of online how-to’s, I settled on McCalls M5499, which was recommended on several Merida-dress-making tutorials.

Like Merida’s dress, view A of the pattern has princess seams, and a dip in the middle of the neckline (though Merida laces the dip closed). In the picture, it's the green dress but with straight sleeves. The pattern, also has “normal” sleeves (ie, NOT bell-like or flowing/dangling sleeves like many medieval dress costume patterns), which is a good starting point for the detached sleeves. No pattern exists for the detached sleeves, so I knew I was on my own for that part.

The pattern laces up the back, which seems fitting enough. I couldn’t find ANY pictures of Merida’s back, and didn’t remember the back of the dress from seeing the movie, so I had no idea how her dress might have closed. (Laced? Buttoned? Some sort of hook/eye?) Buttons with buttonholes were a relatively new technology in northwestern Europe in late medieval times. Prior to buttons, clothing would have been pulled on, or laced closed.) But doing this kind of closure was a first for me.
Sizing was a problem, though. Kivi fell exactly between the child and adult version of the pattern. The kid’s version of the pattern covers sizes 3-8, with a chest measurement topping out at 27”. Kivi is almost 11, and has a 30” chest, so the kid pattern wasn’t going to work.
The adult version is for sizes 8-22, with chest measurements starting at 32.5”, which is slightly closer to Kivi’s size. All-righty, then. Adult pattern, it is. I wasn’t sure how I’d make it fit, because she is quite a bit smaller than a woman’s size 8 (perhaps a 4?). I figured I’d think of something.
One thing to consider: Despite matching costumes being depicted on the pattern envelope, in order to actually make matching costumes, you would have to buy the pattern twice; once for a child, and once for an adult (if the child is age 3-8, that is).s
Fabrics:
The dress: The “real” (ahem) Merida’s dress would mostly likely have been made from a fairly sturdy wool. I COULD have used wool, I suppose. However, wool is expensive, often not machine washable/dryable and thus impractical for a child’s costume, and usually ITCHY (except for the most expensive, finely woven merinos). I also would have had to order it, and I wanted to see and feel it before buying. I also wanted to use my coupons from Joanne’s. Cheap trumps historical authenticity!
I chose a dark turquoise linen/poly blend for the outer dress. Linen was in common use during medieval times (especially among the nobility), so I considered that a good substitute. (We’ll just have to ignore the - strictly modern – polyester.)
Merida’s chemise (underdress) would likely have been made from a very fine, undyed linen. There was no question about using linen for the underdress, though. The stuff I could get cheaply enough to suit my budget would have been too itchy for Kivi. Instead, I used a cream cotton flannel for the chemise.
Cotton did exist in the middle ages, even in northwestern Europe, but it was expensive, hard to get, and only rarely used. (It was all over the place in India and Egypt, though.) The fact that it existed in Scotland at all, is good enough for me. Besides, these days it’s cheap (even before using coupons), soft, and warm. Like Scotland, late October in Minnesota can be quite cold.
I pretreated the heck out of the fabrics. I washed and dried the fabrics 3 times (in my thoroughly modern washer and dryer – no trips to a local stream were necessary). Flannel is a progressive shrinker, and a long time ago I learned the hard way that a single trip through the washer and dryer isn’t enough. Linen is usually considered a dry-clean-only fabric, but as long as it’s washed and dried a few times prior to sewing, it does fine in normal laundry (and even gets softer over time), though it wrinkles something fierce. I figure Merida doesn’t care that her dress is wrinkly.
The turquoise fabric dye was bleeding a lot though, even after 3 washes. I used a dye-catcher sheet in the washer during the SECOND time I washed it, and it turned as dark as the fabric itself! The third wash was quite a bit better, but was still running a great deal. So, I did some research and treated the fabric with a product called Retayne, which helps to fix dye, as long as the garment is washed in cold water after being treated. I intended to join the cream underdress to the dark outer dress, so will write washing instructions (cold water wash, and include a dye catcher) inside with a fabric marker, so that the chemise isn’t dyed blue accidentally in future washes.

Cutting out the pattern:
I cut out the pattern twice – once for the dress and once for the chemise.
I only made one pattern modification at that point – I shortened the pieces. Each of the bodice pieces had two solid double lines printed about 8” apart in the hip/waist/rib-cage area, and the pieces indicate that you are supposed to lengthen or shorten between those two lines. I pleated the pattern pieces and matched up the lines and taped it in place. Then when I cut the pieces out, I had to figure out how to cut the area of the pleat. One side lines up, but the other side doesn’t. You kind of have to …. Connect the dots, for lack of a better description, creating a smooth transition, rather than a weird stair-stepped shape.
One thing of note for this pattern – the lacing strips that you attach to the back of the dress do NOT have any instructions for shortening. So you either leave them long (which is what I did), or you shorten them appropriately.
Constructing the main dress:
I’ve mentioned historical authenticity. Don’t let that fool you – I never even considered hand-sewing the dress, which I avoid as much as possible! I like my modern sewing machine just fine. So I used both my sewing machine and serger. I decided to sew it with my sewing machine (using the serger for finishing edges only), as the 5/8” seams would allow for future growth – we can let out the side seams if need be. I’m probably being over optimistic, though. Sigh….
I ran all the pieces through my serger, which both finished the edges, and stay stitched at the same time. Linen is particularly ravelly, so I figured it was necessary. I then used a sharpie to transfer the markings to the seam allowances, where they wouldn’t show on the finished dress.
Constructing the main part of the two dresses was easy. I just followed the pattern instructions for body of the dresses, and only deviated from the instructions slightly:
Hemming:
Normally hemming is done last, though there’s no real reason it can’t be done as soon as the main construction is complete. I did it next, in order to make trying it on easier for Kivi, as it was 5” too long. The dress, with unfinished bottom was long enough to be nearly ankle length on me, and my daughter is quite a bit shorter than I am. So, the first thing I did, was to put a permanent, narrow hem on both dresses, which left the dress about 4” too long for Kivi.
I then turned the outer skirt under by 4”, lined up the seams, pinned and gathered until it all fit (the skirt is an A-line, which means that when you hem it, the top edge of the hem is wider than the bottom edge, which makes it a hassle to hem). I pressed and then used the longest machine stitch to hold it in place (it’s the same as the basting stitch, but has normal, rather than loose, stitch tension). That way, I can easily let out the hem when she grows taller.
For the chemise, I put another narrow, permanent hem, then attached the eyelet (a deviation from the movie version – the bottom edge of her underdress was plain in the movie), THEN shortened it by 4”. But since the eyelet was in place, I couldn’t just turn the fabric up, or the eyelet would be hidden. So I accordioned/pleated it all the way around, and sewed two rows of basting stitch to hold it in place, so the eyelet would still show.
A note about the eyelet trim: From looking closely at pictures on the net, I think the “eyelet” would have been formed by cutting the sleeves and neckline very wide, then smocking the fabric to draw in/gather it, hence creating a self-ruffle along the edge. I took a shortcut and used eyelet trim instead. No regrets there!
Detached and Split sleeves:
Now for the sleeves. This was probably the most iconic part of the costume, THE attribute that makes the dress recognizably Merida’s. This was also the part I had to make up as I went along, as you won’t find patterns for them (at least not from the main pattern manufacturers, and possibly not from any indy pattern makers, either). Fortunately, it wasn’t hard.
I measured Kivi’s upper and lower arms and then guessed at where I needed to cut across the sleeve, hopefully where her elbow would be. I wanted to accommodate future growth, so left as much intact as possible.
Once I cut across the sleeve, I finished the top and bottom edges of both the upper and lower sleeve pieces. On the lower arm pieces, that was easy, as they were straight across. The upper arm was another story. For those who don’t sew, a sleeve isn’t just a tube of fabric. It’s actually taller on the shoulder side, than on the armpit side, and when it’s laying flat/unsewn, the shoulder is roughly the shape of a catenary arch. So I had to fold down around the, arch, press it, then do it again, and sew along that edge. That was tedious, and hard to do! I didn’t manage to do it very smoothly, but I doubt anyone would ever notice. I hope not, anyway.
I then used more fabric scraps to create the fabric strips that connect the lower sleeve to the upper sleeve, and also connect the upper sleeve to the shoulder of the dress. I did it the way I created belt loops for my husband’s jeans – I created a long tube of fabric with a ¼” seam, pressed the seam OPEN (and the tube flat at the same time) so that the seam lay open along the middle of the tube, then stitched it open with a zig-zag stitch to prevent unravelling on the raw edges. (Later, I made sure that when I attached the strips to face the raw fabric side to the inside of the sleeve.)
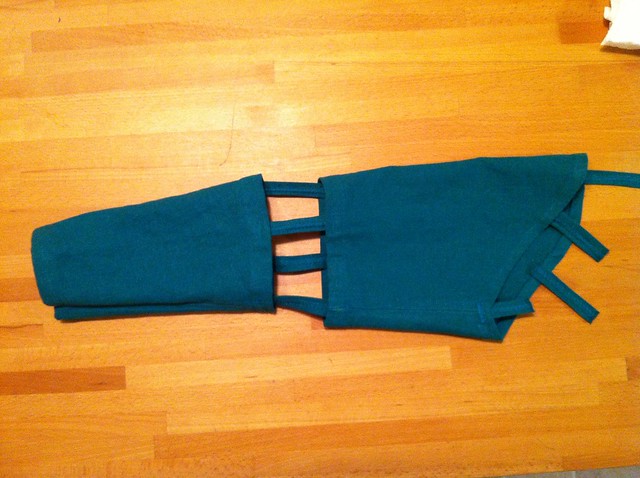
I cut the strips into 16 three-inch pieces, painted the cut edges with Fray Check (another anachronism), and let them dry (the Fray Check made the ends stiff and scratchy, but they wouldn’t touch her skin). Once dry, I attached them to the sleeves. The first one lined up along the underarm seams, and then I repeated the process so that all 4 strips were at ¼ intervals. Ditto for the shoulder. Then I attached the sleeves to the dress. The elbow strips left a 2.5” gap between the upper and lower sleeves. I sewed the shoulder strips so that the gap was only 1” (This was straight from the movie version).
Back Closure:
The back of the dress closes with two strips of fabric with eleven grommets each, sewn to either side of the back opening, with lacing to hold it closed. Because I used an adult pattern, even the size small dress was too big/loose on Kivi. I just moved the strips out (closer to her sides) by about 2.5” on each side. That allowed me to cinch in more of the dress so that it could fit properly.

One problem with the pattern as written is that you have to lace the dress closed, and then unlace it to get it back off again. What a hassle! To get around this, I attached only the left grommet strip directly to the dress, as described in the pattern. For the right strip, I sewed Velcro to the wrong side, and the other half of the Velcro directly to the dress. That allows you to “save” the lacing settings, and get in and out of the dress quickly, and easily, without unlacing/lacing it each time.

But, I was worried that with all the burbling/scrunched fabric between the lacing strips, that there might be a gap between the edges that could show her skin – and given that the lacing extends from nape to under her butt, I wanted it to close for real, so I added a zipper to hold the fabric flaps behind the lacing closed.
Getting the dress on is a cinch – you step in, zip it up, then pull the loose lacing strip across, and stick it to the velcro. I also cut the lacing cord long enough so that it extends all the way across and laces properly, even if a woman big enough that the dress was stretched smooth across the back is wearing it. But on my almost- 11-year old, the lacing strips are pulled tight, almost touching–so the extra cording drags behind her on the ground by six inches! Once we got the lacing where we wanted it, I did some creative twisting/tying to keep it up and out of the way.
Embellishment:
In the movie, Merida’ dress is completely unadorned. But Kivi thought the dress was too plain, so we decided to add a bit of ornamentation.
I had looked for some trim to put around the neckline, but there was nothing subtle enough (I mean, there were strips of sequins in the right color available, but there was no way I’d agree to that), or in the right color, or machine washable (not going to put dry-clean-only trim on a washable dress). I considered putting a thin strip of plaid around it, but there wasn’t anything available in the right colors.
So, I bought a glossy/shiny embroidery thread in a slightly lighter color than the background fabric, and played with decorative stitches, and let Kivi pick the one she liked best. I went once all the way around the neckline (including around the dip) and around the cuffs of the outer dress. Kivi wanted it to go around the hem, too, but I explained that it would mess up the temporary hem I put in.
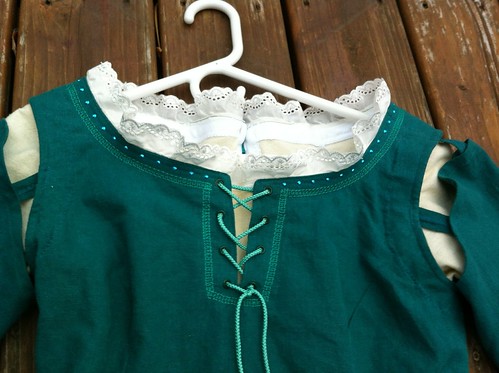
It looked GREAT! I ended up being glad I didn’t find anything, as this turned out better anyway. Nice and understated, but far less plain. I then used my Tulip crystal applicator iron, and glued on tiny turquoise jewels every half inch around the neckline of the dress, which gives it a nice and polished look.

The pattern called for buttons on each cuff, and I decided to go ahead and put them on, even though it was probably anachronistic. I had hoped to find some celtic-knot buttons, but didn’t find any I liked, and just found ones that looked pretty with the colors of the dresses.

Putting the dresses together:
Finally, I put the two dresses together. Getting the outer dress on over the chemise, and getting everything situated properly was a hassle, especially around the neckline and cuffs. I wanted to make it easy to slip the dress on, and have everything just be in the right place.
I hand-stitched (ick) the chemise to the back side of the zipper, so that ensured that the chemise “protected” her skin from the outer dress. It also made it so the zipper held both dresses closed. I also hand-stitched the cuffs in place, so that the eyelet just peeks out from under the lower sleeve, and then machine-stitched (woo-hoo!) the two necklines together, (leaving a gap at the dip, which allows for a bit of extra gathering of the chemise at that point).
Flaws:
There are two significant flaws in the dress. Now, before all my copious readers start telling me “it’s not a flaw, it’s a design element,” or “Oh, nobody would ever notice!” I just want to say, that YES they are genuine flaws, not design elements. They are mistakes, and I’m fine with that. I think the dress turned out really well, despite those flaws, but that doesn’t mean I don’t look for ways I could have done better - things that might make my NEXT project better.
Both flaws are in the sleeves.
The first is that those plain, narrow sleeves that were a great starting point for the dress, weren’t so great for the chemise. Merida’s chemise puffs out a lot at the elbow and a little at the shoulder, and would probably have been made of a very fine, thin material, and the sleeves would likely have been very full.
Kivi’s chemise doesn’t puff out AT ALL, and I didn’t spot that flaw until it was too late (well, until I was no longer willing to correct it, anyway). Late October in Minnesota is chilly, so I used flannel for the underdress, and wide sleeves would have been bulky and uncomfortable under the closer-fitting outer sleeves. Perhaps if the chemise sleeves were of a normal size at the shoulder and wrist, and belled out slightly at the elbow, it might have worked. Ah well. Not gonna change it.
Kivi thinks puffy sleeves are ugly, and initially didn’t WANT them to puff out. In the end, she admitted that she wished they had puffed out a LITTLE, but she and I both agreed that it wasn’t worth the effort to correct it, either to re-do the sleeves, or to add some sort of insert. It looks good anyway, and doesn’t look like a mistake (unless you know better).
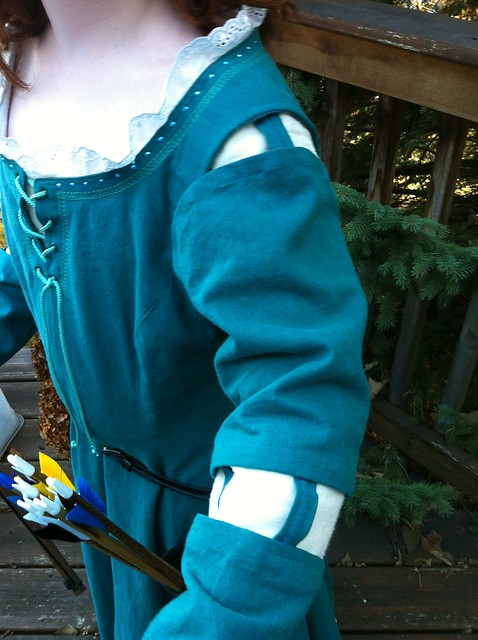
The other flaw is where I split the outer sleeves. I guessed wrong about where to cut the sleeve, and Kivi’s elbow is actually inside the upper sleeve. Huh. Not going to fix that, either. That mistake has more to do with the fact that I used an adult pattern - and didn’t make the sleeve any shorter to accommodate Kivi’s smaller size.
This photo actually shows both issues:
Accessories:
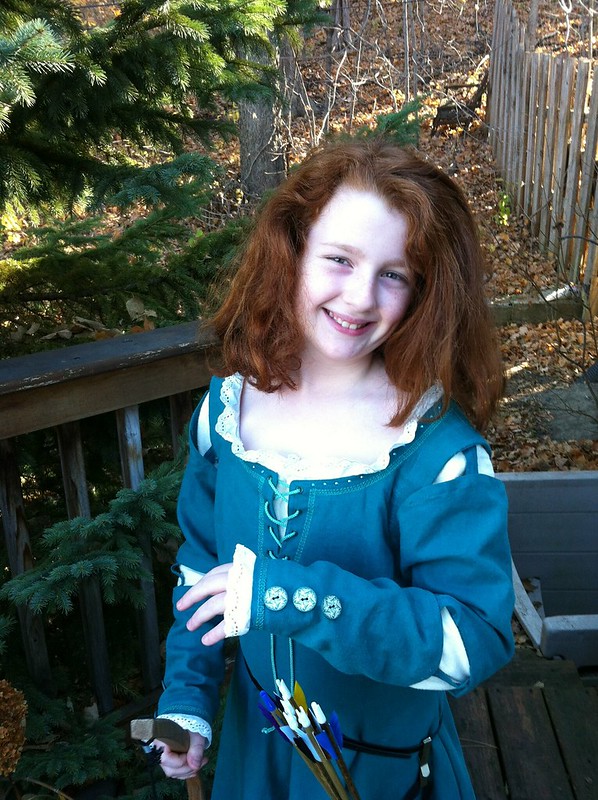
Merida wears a quiver at her hip, dangling from a belt, rather than strapped to her back. I think it must be so that she can wear a cloak over it, and still get to her arrows. I ordered a cheap belt quiver from an Amazon vendor, and the belt came from an old pair of jeans she already had.
We bought the bow and arrows from a vendor at the local Renaissance Festival. It’s pretty neat – the string is a thin bungee which makes it easier to pull, and doesn’t launch the arrows with anywhere NEAR the force that a real bow would.
This is one of my favorite costumes ever. EVENTUALLY, I might even make one for me. Happy Halloween!


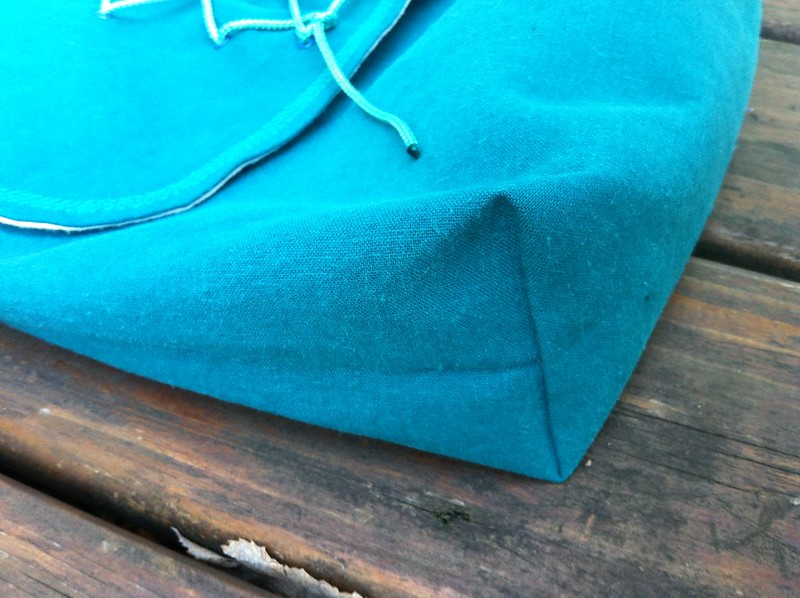
It's even got a flat bottom:
Another year to go overboard on my daughter’s Halloween costume. But it’s fun for both of us – she gets a great costume, and I get to work on a fun, creative project.
Side note – my original version of this article was nearly 3000 words long. So I’ve created two versions:
- The TLDR summary version, which is linked HERE. You get some pretty pictures, a few anecdotes, and just a hint of how I made the dress. It’s probably still too long, though. Those who know me, know if nothing else, I’m wordy.
- The long version, which includes more of the story, and which is probably detailed enough to help someone make their own Merida costume, is below.
So… pick and choose the one you want to read. Or, if you are REALLY dye-hard (pun intended) you can read BOTH! :-)
This year, Kivi agreed to be Princess Merida from the Pixar movie Brave. Normally, she picks the costume, though she’s not allowed to change her mind once we start buying what we need for the costume. Then we work together to pick the fabrics and other details. She’s also usually content to let me run with it, which I love. I get to flex my creative muscles.
This year, however, it was my idea that she dress up as Princess Merida, and I suggested it several months before it was released in the theaters. She’s got naturally wavy red hair, so it seemed a natural fit. In the past, Kivi has REFUSED to let me dress her in other traditional red-head costumes like Little Orphan Annie, or Raggedy Ann, so I was pretty excited when she humored me and agreed to be Merida.
Initially she wasn’t really all that enthusiastic. All we had to go on were a few pictures that were published in advance of the movie. She started getting excited when the trailers were released, and then once she saw the movie … well, after that, I didn’t have to convince her. Merida isn’t just a princess (although, that’s certainly an added bonus), but she’s also a badass archer.
Honestly though, I don’t know how much humoring there really was – she squeals in excitement every time she tries on the dress. She also got a fun bow-and-arrow toy out of it, so she’s not complaining.
Merida wears three dresses in the movie:
- A brown dress in a brief flashback scene from when she was a toddler. I didn’t get a good look at it – so that’s out. Besides, the toddler Merida isn’t a badass archer (not yet). ;-)
- A blue-and-white formal number that her mother forces her to wear to an archery competition – it’s blue and white satin, with some gold trim, and a white headcovering held in place with a gold crown/circlet. It’s the dress that she splits the shoulder seams in order to (out) shoot for her own hand. (Interesting historical note – the ripping reveals a corset – which wouldn’t have been worn until the 1500s, roughly 400 or so years after the medieval setting of the movie). That dress is merely OK. (Though making the version AFTER it ripped at the seams might be fun).
- A dark teal/turquoise dress that I think of as Merida’s favorite dress. It has detached sleeves that are split at the elbow, with strips joining the upper and lower arms, and more strips joining the sleeves to the shoulder, both of which are designed to to give total freedom of movement in the arms and shoulders, something Merida needs to shoot properly. The sleeves reveal her underdress/chemise at the shoulder and elbow, and I can just see Merida arguing with her mother to achieve a balance between decorum (no showing bra-straps or exposed thong underwear for YOU young lady!) and practicality. This is the one I decided to make.
The Pattern:
After a brief search of online how-to’s, I settled on McCalls M5499, which was recommended on several Merida-dress-making tutorials.
Like Merida’s dress, view A of the pattern has princess seams, and a dip in the middle of the neckline (though Merida laces the dip closed). In the picture, it's the green dress but with straight sleeves. The pattern, also has “normal” sleeves (ie, NOT bell-like or flowing/dangling sleeves like many medieval dress costume patterns), which is a good starting point for the detached sleeves. No pattern exists for the detached sleeves, so I knew I was on my own for that part.
The pattern laces up the back, which seems fitting enough. I couldn’t find ANY pictures of Merida’s back, and didn’t remember the back of the dress from seeing the movie, so I had no idea how her dress might have closed. (Laced? Buttoned? Some sort of hook/eye?) Buttons with buttonholes were a relatively new technology in northwestern Europe in late medieval times. Prior to buttons, clothing would have been pulled on, or laced closed.) But doing this kind of closure was a first for me.
Sizing was a problem, though. Kivi fell exactly between the child and adult version of the pattern. The kid’s version of the pattern covers sizes 3-8, with a chest measurement topping out at 27”. Kivi is almost 11, and has a 30” chest, so the kid pattern wasn’t going to work.
The adult version is for sizes 8-22, with chest measurements starting at 32.5”, which is slightly closer to Kivi’s size. All-righty, then. Adult pattern, it is. I wasn’t sure how I’d make it fit, because she is quite a bit smaller than a woman’s size 8 (perhaps a 4?). I figured I’d think of something.
One thing to consider: Despite matching costumes being depicted on the pattern envelope, in order to actually make matching costumes, you would have to buy the pattern twice; once for a child, and once for an adult (if the child is age 3-8, that is).s
Fabrics:
The dress: The “real” (ahem) Merida’s dress would mostly likely have been made from a fairly sturdy wool. I COULD have used wool, I suppose. However, wool is expensive, often not machine washable/dryable and thus impractical for a child’s costume, and usually ITCHY (except for the most expensive, finely woven merinos). I also would have had to order it, and I wanted to see and feel it before buying. I also wanted to use my coupons from Joanne’s. Cheap trumps historical authenticity!
I chose a dark turquoise linen/poly blend for the outer dress. Linen was in common use during medieval times (especially among the nobility), so I considered that a good substitute. (We’ll just have to ignore the - strictly modern – polyester.)
Merida’s chemise (underdress) would likely have been made from a very fine, undyed linen. There was no question about using linen for the underdress, though. The stuff I could get cheaply enough to suit my budget would have been too itchy for Kivi. Instead, I used a cream cotton flannel for the chemise.
Cotton did exist in the middle ages, even in northwestern Europe, but it was expensive, hard to get, and only rarely used. (It was all over the place in India and Egypt, though.) The fact that it existed in Scotland at all, is good enough for me. Besides, these days it’s cheap (even before using coupons), soft, and warm. Like Scotland, late October in Minnesota can be quite cold.
I pretreated the heck out of the fabrics. I washed and dried the fabrics 3 times (in my thoroughly modern washer and dryer – no trips to a local stream were necessary). Flannel is a progressive shrinker, and a long time ago I learned the hard way that a single trip through the washer and dryer isn’t enough. Linen is usually considered a dry-clean-only fabric, but as long as it’s washed and dried a few times prior to sewing, it does fine in normal laundry (and even gets softer over time), though it wrinkles something fierce. I figure Merida doesn’t care that her dress is wrinkly.
The turquoise fabric dye was bleeding a lot though, even after 3 washes. I used a dye-catcher sheet in the washer during the SECOND time I washed it, and it turned as dark as the fabric itself! The third wash was quite a bit better, but was still running a great deal. So, I did some research and treated the fabric with a product called Retayne, which helps to fix dye, as long as the garment is washed in cold water after being treated. I intended to join the cream underdress to the dark outer dress, so will write washing instructions (cold water wash, and include a dye catcher) inside with a fabric marker, so that the chemise isn’t dyed blue accidentally in future washes.

Cutting out the pattern:
I cut out the pattern twice – once for the dress and once for the chemise.
I only made one pattern modification at that point – I shortened the pieces. Each of the bodice pieces had two solid double lines printed about 8” apart in the hip/waist/rib-cage area, and the pieces indicate that you are supposed to lengthen or shorten between those two lines. I pleated the pattern pieces and matched up the lines and taped it in place. Then when I cut the pieces out, I had to figure out how to cut the area of the pleat. One side lines up, but the other side doesn’t. You kind of have to …. Connect the dots, for lack of a better description, creating a smooth transition, rather than a weird stair-stepped shape.
One thing of note for this pattern – the lacing strips that you attach to the back of the dress do NOT have any instructions for shortening. So you either leave them long (which is what I did), or you shorten them appropriately.
Constructing the main dress:
I’ve mentioned historical authenticity. Don’t let that fool you – I never even considered hand-sewing the dress, which I avoid as much as possible! I like my modern sewing machine just fine. So I used both my sewing machine and serger. I decided to sew it with my sewing machine (using the serger for finishing edges only), as the 5/8” seams would allow for future growth – we can let out the side seams if need be. I’m probably being over optimistic, though. Sigh….
I ran all the pieces through my serger, which both finished the edges, and stay stitched at the same time. Linen is particularly ravelly, so I figured it was necessary. I then used a sharpie to transfer the markings to the seam allowances, where they wouldn’t show on the finished dress.
Constructing the main part of the two dresses was easy. I just followed the pattern instructions for body of the dresses, and only deviated from the instructions slightly:
- On the chemise, I finished the neckline straight across (no dip in the front), and didn’t use interfacing, or the facing pieces to finish the raw edges of the neck and back opening Instead, I just finished the raw edges with bias binding strips cut from scrap flannel. Nice and soft and comfy, with no stiff fabric against the skin. I also sewed on off-white eyelet trim to the cuffs and neckline.
- On the dress, I followed the pattern exactly, except that I finished the armholes like you would a tank top, again with bias strips made from leftover fabric. The dip/split in the neckline was hard to do correctly, and looked a little sloppy. I would have liked better instructions, or at least some tips. The embellishment I later added to the neckline pretty much hid the sloppy work, so I’m not unhappy with it. I also added (thoroughly anachronistic) grommets and lacing to hold the neckline dip closed.
Hemming:
Normally hemming is done last, though there’s no real reason it can’t be done as soon as the main construction is complete. I did it next, in order to make trying it on easier for Kivi, as it was 5” too long. The dress, with unfinished bottom was long enough to be nearly ankle length on me, and my daughter is quite a bit shorter than I am. So, the first thing I did, was to put a permanent, narrow hem on both dresses, which left the dress about 4” too long for Kivi.
I then turned the outer skirt under by 4”, lined up the seams, pinned and gathered until it all fit (the skirt is an A-line, which means that when you hem it, the top edge of the hem is wider than the bottom edge, which makes it a hassle to hem). I pressed and then used the longest machine stitch to hold it in place (it’s the same as the basting stitch, but has normal, rather than loose, stitch tension). That way, I can easily let out the hem when she grows taller.
For the chemise, I put another narrow, permanent hem, then attached the eyelet (a deviation from the movie version – the bottom edge of her underdress was plain in the movie), THEN shortened it by 4”. But since the eyelet was in place, I couldn’t just turn the fabric up, or the eyelet would be hidden. So I accordioned/pleated it all the way around, and sewed two rows of basting stitch to hold it in place, so the eyelet would still show.
A note about the eyelet trim: From looking closely at pictures on the net, I think the “eyelet” would have been formed by cutting the sleeves and neckline very wide, then smocking the fabric to draw in/gather it, hence creating a self-ruffle along the edge. I took a shortcut and used eyelet trim instead. No regrets there!
Detached and Split sleeves:
Now for the sleeves. This was probably the most iconic part of the costume, THE attribute that makes the dress recognizably Merida’s. This was also the part I had to make up as I went along, as you won’t find patterns for them (at least not from the main pattern manufacturers, and possibly not from any indy pattern makers, either). Fortunately, it wasn’t hard.
I measured Kivi’s upper and lower arms and then guessed at where I needed to cut across the sleeve, hopefully where her elbow would be. I wanted to accommodate future growth, so left as much intact as possible.
Once I cut across the sleeve, I finished the top and bottom edges of both the upper and lower sleeve pieces. On the lower arm pieces, that was easy, as they were straight across. The upper arm was another story. For those who don’t sew, a sleeve isn’t just a tube of fabric. It’s actually taller on the shoulder side, than on the armpit side, and when it’s laying flat/unsewn, the shoulder is roughly the shape of a catenary arch. So I had to fold down around the, arch, press it, then do it again, and sew along that edge. That was tedious, and hard to do! I didn’t manage to do it very smoothly, but I doubt anyone would ever notice. I hope not, anyway.
I then used more fabric scraps to create the fabric strips that connect the lower sleeve to the upper sleeve, and also connect the upper sleeve to the shoulder of the dress. I did it the way I created belt loops for my husband’s jeans – I created a long tube of fabric with a ¼” seam, pressed the seam OPEN (and the tube flat at the same time) so that the seam lay open along the middle of the tube, then stitched it open with a zig-zag stitch to prevent unravelling on the raw edges. (Later, I made sure that when I attached the strips to face the raw fabric side to the inside of the sleeve.)
I cut the strips into 16 three-inch pieces, painted the cut edges with Fray Check (another anachronism), and let them dry (the Fray Check made the ends stiff and scratchy, but they wouldn’t touch her skin). Once dry, I attached them to the sleeves. The first one lined up along the underarm seams, and then I repeated the process so that all 4 strips were at ¼ intervals. Ditto for the shoulder. Then I attached the sleeves to the dress. The elbow strips left a 2.5” gap between the upper and lower sleeves. I sewed the shoulder strips so that the gap was only 1” (This was straight from the movie version).
Back Closure:
The back of the dress closes with two strips of fabric with eleven grommets each, sewn to either side of the back opening, with lacing to hold it closed. Because I used an adult pattern, even the size small dress was too big/loose on Kivi. I just moved the strips out (closer to her sides) by about 2.5” on each side. That allowed me to cinch in more of the dress so that it could fit properly.
One problem with the pattern as written is that you have to lace the dress closed, and then unlace it to get it back off again. What a hassle! To get around this, I attached only the left grommet strip directly to the dress, as described in the pattern. For the right strip, I sewed Velcro to the wrong side, and the other half of the Velcro directly to the dress. That allows you to “save” the lacing settings, and get in and out of the dress quickly, and easily, without unlacing/lacing it each time.
But, I was worried that with all the burbling/scrunched fabric between the lacing strips, that there might be a gap between the edges that could show her skin – and given that the lacing extends from nape to under her butt, I wanted it to close for real, so I added a zipper to hold the fabric flaps behind the lacing closed.
Getting the dress on is a cinch – you step in, zip it up, then pull the loose lacing strip across, and stick it to the velcro. I also cut the lacing cord long enough so that it extends all the way across and laces properly, even if a woman big enough that the dress was stretched smooth across the back is wearing it. But on my almost- 11-year old, the lacing strips are pulled tight, almost touching–so the extra cording drags behind her on the ground by six inches! Once we got the lacing where we wanted it, I did some creative twisting/tying to keep it up and out of the way.
Embellishment:
In the movie, Merida’ dress is completely unadorned. But Kivi thought the dress was too plain, so we decided to add a bit of ornamentation.
I had looked for some trim to put around the neckline, but there was nothing subtle enough (I mean, there were strips of sequins in the right color available, but there was no way I’d agree to that), or in the right color, or machine washable (not going to put dry-clean-only trim on a washable dress). I considered putting a thin strip of plaid around it, but there wasn’t anything available in the right colors.
So, I bought a glossy/shiny embroidery thread in a slightly lighter color than the background fabric, and played with decorative stitches, and let Kivi pick the one she liked best. I went once all the way around the neckline (including around the dip) and around the cuffs of the outer dress. Kivi wanted it to go around the hem, too, but I explained that it would mess up the temporary hem I put in.
It looked GREAT! I ended up being glad I didn’t find anything, as this turned out better anyway. Nice and understated, but far less plain. I then used my Tulip crystal applicator iron, and glued on tiny turquoise jewels every half inch around the neckline of the dress, which gives it a nice and polished look.
The pattern called for buttons on each cuff, and I decided to go ahead and put them on, even though it was probably anachronistic. I had hoped to find some celtic-knot buttons, but didn’t find any I liked, and just found ones that looked pretty with the colors of the dresses.
Putting the dresses together:
Finally, I put the two dresses together. Getting the outer dress on over the chemise, and getting everything situated properly was a hassle, especially around the neckline and cuffs. I wanted to make it easy to slip the dress on, and have everything just be in the right place.
I hand-stitched (ick) the chemise to the back side of the zipper, so that ensured that the chemise “protected” her skin from the outer dress. It also made it so the zipper held both dresses closed. I also hand-stitched the cuffs in place, so that the eyelet just peeks out from under the lower sleeve, and then machine-stitched (woo-hoo!) the two necklines together, (leaving a gap at the dip, which allows for a bit of extra gathering of the chemise at that point).
Flaws:
There are two significant flaws in the dress. Now, before all my copious readers start telling me “it’s not a flaw, it’s a design element,” or “Oh, nobody would ever notice!” I just want to say, that YES they are genuine flaws, not design elements. They are mistakes, and I’m fine with that. I think the dress turned out really well, despite those flaws, but that doesn’t mean I don’t look for ways I could have done better - things that might make my NEXT project better.
Both flaws are in the sleeves.
The first is that those plain, narrow sleeves that were a great starting point for the dress, weren’t so great for the chemise. Merida’s chemise puffs out a lot at the elbow and a little at the shoulder, and would probably have been made of a very fine, thin material, and the sleeves would likely have been very full.
Kivi’s chemise doesn’t puff out AT ALL, and I didn’t spot that flaw until it was too late (well, until I was no longer willing to correct it, anyway). Late October in Minnesota is chilly, so I used flannel for the underdress, and wide sleeves would have been bulky and uncomfortable under the closer-fitting outer sleeves. Perhaps if the chemise sleeves were of a normal size at the shoulder and wrist, and belled out slightly at the elbow, it might have worked. Ah well. Not gonna change it.
Kivi thinks puffy sleeves are ugly, and initially didn’t WANT them to puff out. In the end, she admitted that she wished they had puffed out a LITTLE, but she and I both agreed that it wasn’t worth the effort to correct it, either to re-do the sleeves, or to add some sort of insert. It looks good anyway, and doesn’t look like a mistake (unless you know better).
The other flaw is where I split the outer sleeves. I guessed wrong about where to cut the sleeve, and Kivi’s elbow is actually inside the upper sleeve. Huh. Not going to fix that, either. That mistake has more to do with the fact that I used an adult pattern - and didn’t make the sleeve any shorter to accommodate Kivi’s smaller size.
This photo actually shows both issues:
Accessories:
Merida wears a quiver at her hip, dangling from a belt, rather than strapped to her back. I think it must be so that she can wear a cloak over it, and still get to her arrows. I ordered a cheap belt quiver from an Amazon vendor, and the belt came from an old pair of jeans she already had.
We bought the bow and arrows from a vendor at the local Renaissance Festival. It’s pretty neat – the string is a thin bungee which makes it easier to pull, and doesn’t launch the arrows with anywhere NEAR the force that a real bow would.
This is one of my favorite costumes ever. EVENTUALLY, I might even make one for me. Happy Halloween!
:
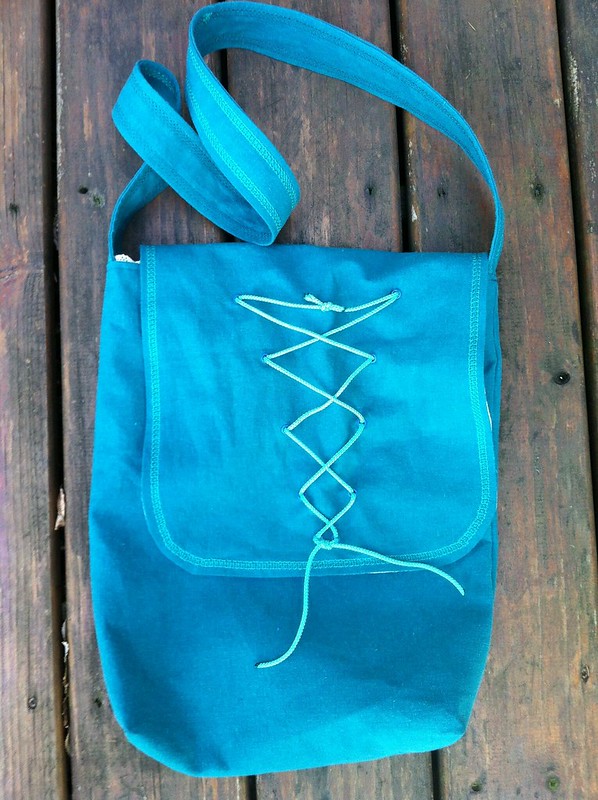
I also created a matching treat bag out of leftover fabric. I normally just wing it, and my results have been ... OK. Functional, but not anything special. I decided to try something a bit more polished, and followed these instructions.
Here's the outside of the bag:
Here's the inside:
Merida Dress - Short Version
So …. Halloween 2012.
Another year to go overboard on my daughter’s Halloween costume. But it’s fun for both of us – she gets a great costume, and I get to work on a fun, creative project.
Side note – my original version of this article was nearly 3000 words long. So I’ve created two versions:
So… pick and choose the one you want to read. Or, if you are REALLY dye-hard (pun intended) you can read BOTH! :-)
This year, Kivi is dressing as Princess Merida, from the Pixar movie Brave. Since she has naturally red, wavy hair, it seemed like a natural fit. Besides, Merida isn’t just a princess (although, that’s an added bonus), she’s also a badass archer.
Merida wears three dresses in the movie, but I only wanted to make what I think of as Merida’s favorite dress – it’s a dark turquoise dress with detached and split sleeves that allow full arm movement so that she can shoot properly.
It’s THIS dress:
After a brief search of online how-to’s, I settled on McCalls M5499. It has the right kind of bodice and skirt (princess seams), and a dip in the front neckline. It also had plain sleeves, which is a good starting point. No pattern exists for the detached sleeves, so I knew I was on my own for that part. The pattern laces up the back, which seems fitting enough.
Sizing was a problem, though. Kivi fell exactly between the child and adult version of the pattern. The kid’s version of the pattern covers sizes 3-8, with a chest measurement topping out at 27”. Kivi is almost 11, and has a 30” chest, so the kid pattern wasn’t going to work.
The adult version is for sizes 8-22, with chest measurements starting at 32.5”, which is slightly closer to Kivi’s size. All-righty, then. Adult pattern, it is. I wasn’t sure how I’d make it fit, because she is quite a bit smaller than a woman’s size 8 (perhaps a 4?). I figured I’d think of something.
I chose a dark turquoise linen/poly blend for the outer dress. The real (ahem) Merida’s dress would mostly likely have been made of wool, which is too expensive, impractical, and too difficult to get. Linen was in common use during medieval times (especially among the nobility), so I considered that a good substitute. (We’ll just have to ignore the - strictly modern – polyester.) Besides, I could use a 50% off coupon from Joanne’s to buy it. Cheap trumps historical authenticity!
I used a cream cotton flannel for the underdress/chemise. Cotton did exist during medieval times, even in Europe, but it was expensive and only rarely used in northwestern Europe. The fact that it existed there at all, is good enough for me. Besides, it’s cheap (even before using coupons), soft, and warm.
I washed and dried the fabrics 3 times (in my thoroughly modern washer and dryer – no trips to a local stream were necessary). The turquoise fabric was bleeding a lot though, even after 3 washes, so I treated it with a product called Retayne to prevent further dye-loss. I didn’t want it to dye the chemise blue in future washes.
I cut out the pattern twice – once for the outer dress and once for the chemise.
I’ve mentioned historical authenticity. Don’t let that fool you – I never even considered hand-sewing the dress, which I avoid as much as possible!
Constructing the main part of the two dresses was easy. I just followed the pattern instructions for body of the dresses, and only deviated from the instructions slightly:
I hemmed both dresses up with a basting stitch, so the hems can be let down easily.
Now for the hard parts: The outer sleeves, and the back closure.
I split the sleeves in half across where the elbow would be, and finished the top and bottom edges, and joined them into tubes. I then made finished strips of fabric out of more scrap, and attached the lower sleeve to the upper sleeve, with a 2.5” gap.
I then attached the upper sleeve to the shoulder in the same way, but with a 1” gap. Worked out pretty well, except that I guessed wrong about where to cut the sleeve, and Kivi’s elbow is actually inside the upper sleeve. Oops. Ah well. Not gonna change it.
Because I used an adult pattern, the dress was too big/loose on Kivi. The back of the dress closes with two strips of fabric with thoroughly anachronistic grommets, sewn on either side of the back opening, with lacing holding it closed. I just moved the strips out (closer to her sides) by about 2.5” on each side. That allowed me to cinch in more of the dress so that it could fit properly.
I also attached only the left grommet strip directly to the dress. I sewed Velcro to the right strip, and the other half of the Velcro to the dress. That allows you to “save” the lacing settings, and get in and out of the dress easily, without unlacing/lacing it each time. I added a zipper to hold the fabric flaps under the lacing closed.
Kivi thought the dress was too plain (the dress is completely unadorned in the movie), so we added a bit of ornamentation. I couldn’t find any trim that I liked, so I just used glossy embroidery thread and added a decorative stitch around the neckline and cuffs, and applied some iron-on jewels around the neckline.
Finally, I put the two dresses together. Had to hand-sew (ick) the back opening of the chemise to the back of the zipper, so that the zipper would hold both dresses closed. I also hand stitched the two cuffs together, and then machine-stitched (woo-hoo!) the two necklines together.
I also found that the inner sleeves were not voluminous enough to puff out at the elbow. Huh. Not going to fix that, either.
I bought the bow-and-arrows from a vendor at the local RenFest. I ordered the belt quiver from an Amazon vendor, and the belt came from a pair of jeans she already had.
This is one of my favorite costumes ever. EVENTUALLY, I might even make one for me. Happy Halloween!
Another year to go overboard on my daughter’s Halloween costume. But it’s fun for both of us – she gets a great costume, and I get to work on a fun, creative project.
Side note – my original version of this article was nearly 3000 words long. So I’ve created two versions:
- The TLDR summary version, which is below. You get some pretty pictures, a few anecdotes, and just a hint of how I made the dress. It’s probably still too long, though. Those who know me, know if nothing else, I’m wordy.
- The long version, which includes more of the story, and which is probably detailed enough to help someone make their own Merida costume, is linked HERE.
So… pick and choose the one you want to read. Or, if you are REALLY dye-hard (pun intended) you can read BOTH! :-)
This year, Kivi is dressing as Princess Merida, from the Pixar movie Brave. Since she has naturally red, wavy hair, it seemed like a natural fit. Besides, Merida isn’t just a princess (although, that’s an added bonus), she’s also a badass archer.
Merida wears three dresses in the movie, but I only wanted to make what I think of as Merida’s favorite dress – it’s a dark turquoise dress with detached and split sleeves that allow full arm movement so that she can shoot properly.
It’s THIS dress:
After a brief search of online how-to’s, I settled on McCalls M5499. It has the right kind of bodice and skirt (princess seams), and a dip in the front neckline. It also had plain sleeves, which is a good starting point. No pattern exists for the detached sleeves, so I knew I was on my own for that part. The pattern laces up the back, which seems fitting enough.
Sizing was a problem, though. Kivi fell exactly between the child and adult version of the pattern. The kid’s version of the pattern covers sizes 3-8, with a chest measurement topping out at 27”. Kivi is almost 11, and has a 30” chest, so the kid pattern wasn’t going to work.
The adult version is for sizes 8-22, with chest measurements starting at 32.5”, which is slightly closer to Kivi’s size. All-righty, then. Adult pattern, it is. I wasn’t sure how I’d make it fit, because she is quite a bit smaller than a woman’s size 8 (perhaps a 4?). I figured I’d think of something.
I chose a dark turquoise linen/poly blend for the outer dress. The real (ahem) Merida’s dress would mostly likely have been made of wool, which is too expensive, impractical, and too difficult to get. Linen was in common use during medieval times (especially among the nobility), so I considered that a good substitute. (We’ll just have to ignore the - strictly modern – polyester.) Besides, I could use a 50% off coupon from Joanne’s to buy it. Cheap trumps historical authenticity!
I used a cream cotton flannel for the underdress/chemise. Cotton did exist during medieval times, even in Europe, but it was expensive and only rarely used in northwestern Europe. The fact that it existed there at all, is good enough for me. Besides, it’s cheap (even before using coupons), soft, and warm.
I washed and dried the fabrics 3 times (in my thoroughly modern washer and dryer – no trips to a local stream were necessary). The turquoise fabric was bleeding a lot though, even after 3 washes, so I treated it with a product called Retayne to prevent further dye-loss. I didn’t want it to dye the chemise blue in future washes.
I cut out the pattern twice – once for the outer dress and once for the chemise.
I’ve mentioned historical authenticity. Don’t let that fool you – I never even considered hand-sewing the dress, which I avoid as much as possible!
Constructing the main part of the two dresses was easy. I just followed the pattern instructions for body of the dresses, and only deviated from the instructions slightly:
- On the chemise, I finished the neckline straight across (no dip in the front), and I didn’t use facing pieces to finish the raw edges of the neckline and back opening. Instead, I just finished the raw edges with bias strips cut from scrap flannel. I constructed and attached the sleeves normally. I sewed on eyelet trim to the cuffs, neckline, and hem.
- On the outer dress, I followed the pattern exactly, except that I finished the armholes like you would a tank top, again with scrap fabric. I also added lacing to hold the neckline dip closed.
I hemmed both dresses up with a basting stitch, so the hems can be let down easily.
Now for the hard parts: The outer sleeves, and the back closure.
I split the sleeves in half across where the elbow would be, and finished the top and bottom edges, and joined them into tubes. I then made finished strips of fabric out of more scrap, and attached the lower sleeve to the upper sleeve, with a 2.5” gap.
I then attached the upper sleeve to the shoulder in the same way, but with a 1” gap. Worked out pretty well, except that I guessed wrong about where to cut the sleeve, and Kivi’s elbow is actually inside the upper sleeve. Oops. Ah well. Not gonna change it.
Because I used an adult pattern, the dress was too big/loose on Kivi. The back of the dress closes with two strips of fabric with thoroughly anachronistic grommets, sewn on either side of the back opening, with lacing holding it closed. I just moved the strips out (closer to her sides) by about 2.5” on each side. That allowed me to cinch in more of the dress so that it could fit properly.
I also attached only the left grommet strip directly to the dress. I sewed Velcro to the right strip, and the other half of the Velcro to the dress. That allows you to “save” the lacing settings, and get in and out of the dress easily, without unlacing/lacing it each time. I added a zipper to hold the fabric flaps under the lacing closed.
Kivi thought the dress was too plain (the dress is completely unadorned in the movie), so we added a bit of ornamentation. I couldn’t find any trim that I liked, so I just used glossy embroidery thread and added a decorative stitch around the neckline and cuffs, and applied some iron-on jewels around the neckline.
Finally, I put the two dresses together. Had to hand-sew (ick) the back opening of the chemise to the back of the zipper, so that the zipper would hold both dresses closed. I also hand stitched the two cuffs together, and then machine-stitched (woo-hoo!) the two necklines together.
I also found that the inner sleeves were not voluminous enough to puff out at the elbow. Huh. Not going to fix that, either.
I bought the bow-and-arrows from a vendor at the local RenFest. I ordered the belt quiver from an Amazon vendor, and the belt came from a pair of jeans she already had.
I also created a matching treat bag out of leftover fabric. I normally just wing it, and my results have been ... OK. Functional, but not anything special. I decided to try something a bit more polished, and followed these instructions.
Here's the outside of the bag:
Here's the inside:
It's even got a flat bottom:
This is one of my favorite costumes ever. EVENTUALLY, I might even make one for me. Happy Halloween!
Subscribe to:
Posts (Atom)