14 October 2008

Sewing - so what are all of those stitches used for?

Ok, so I'm not much more than a beginner when it comes to sewing. And when I bought my new sewing machine, a Janome HT2008, it came with 50 different stitches:


(You think that's a lot? There are more advanced machines that come with hundreds of different stitches, and the ability to stitch alphabets and embroider and all sorts of stuff like that).

The problem is that I don't know what all of the stitches are used for. So I created an Excel file with all 50 stitches, the recommended presser foot (that's what the letter below each stitch shown refers to), and pictures of many of the available accessories. The accessory list includes all the presser feet that came with the machine, plus all of the ones I've bought, plus all of the ones I'd like to have. There are certainly more available.

I got all of the stitches and descriptions from the Janome Stitch Learning Center.

Anyway, I created a PDF file for those that don't have Excel, or don't know how to use it. If you have this machine, you might find it useful. You can download it here.

If you want the original Excel file so you can add other stitches (if you have a different machine), or other accessories, then drop me a note or comment, and I'll email it to you.

06 October 2008

Crow's-Feet: A Story-Games Contest Response

I occasionally design games in response to online contests. Some people do it often and produce great stuff. That's not me, but it's still fun. I wasn't really in the make-a-game mode, but something about Jonathan's post at SG kept rattling around in my head and out came the following. I think it's playable in an hour -- even if some people would take longer, I'll try it out and see how it works. I guess I've disregarded the rule about no writing implements at the table — I kind of forgot about that while the idea flowed out of me. I think I'll leave it like that rather than implement some inane replacement like pressing the crow's-feet into aluminum foil with your finger-nail. Also, when I started, I'd kind of expected the graphical role of the illustrated crow's-feet to have a more numeric role in resolution or something but that's not how it worked out.


Crow's-feet
-any of the tiny wrinkles at the outer corners of the eyes resulting from age

Players are expected to be sitting around a table or something. There are the same number of characters as there are players but each character resides between two adjacent players who share it — so that each player has two characters and each character has two players. Each character is represented at the table by a youthful, cut-out face. (To generate these, take pictures, tear them out of magazines, find them on the net, draw them up, use my templates below, whatever.)

These characters that you'll be playing with were in more or less the same clique in high school, twenty years ago. Maybe they're still friends and maybe not. Probably not really; but y'know, friendly. It's a funny time in their lives because high school graduation was such a significant milestone and now they've lived more life after that point than before. And they've seen quite a bit and really lived their lives for a while. Experiences have left tracks on the characters. They've aged.

Aging has good parts and bad and different people react and emphasize these aspect differently. And I think that the way we handle these things has some impact on the way we age. Take crow's-feet; maybe this is myth — though for purposes of this game it isn't: when you laugh and smile a lot, you develop wrinkles radiating out from your eyes in a generally downward direction and when you scowl more, your crow's-feet point more out and up. That's how you'll be recording the story of the characters — by illustrating their crow's-feet. And by calling on those illustrations to influence more of their stories.

So now you're sitting around the table with some friends and you have these cut-out faces lying on the table's surface between you and your neighbors...now what? Grab a fine-point sharpie (or whatever) and the character's face to your right. Write her first name on her forehead — way up high, and put her back on the table. Someone has to start — let's say it's the oldest player. He's going to pick one of his characters and describe a bit of a situation. It'll be either historic or current for the character.

See, the setting of this game is like this: It's late on the evening of their twentieth class reunion — after things have shut down and they've moved, as a group, to someone's house. They talk about the good old days, but more, they talk about Real Life; what's been going on. You're past the bullshit part of the evening and old friends have been reexamining their lives all day. Maybe they've had a few drinks. Now they're confiding.

When it's your turn, you come up with a situation of significance in the character's life; something that helped them to mature. Anything, really. But don't be trying to narrate an outcome — the group will do that collaboratively, just set something up and as play proceeds, you'll learn some cool stuff about the characters.


kidislackingsecurity
partnercausesbuildingsatisfaction
jobexacerbateslosingsufficiency
money
showingexcitement
parent
conflictedheartache
news
socialanxiety
technology

healing
body

function

You can come up with any kind of situation that will lead to significance, but if you want some help, check out this table. There are four lists of words. you can string them together, adding the occasional "not," changing the tense or form and even adding or deleting a word as you want — this is just a helper. For example, maybe you grab "money causes social satisfaction" and set up a situation in which the character, aspiring to "success" can finally buy into a country club or maybe he hires a prostitute to help fill the gaps in his lackluster marriage. Some combinations won't make perfect sense; just fix them up or choose something else.

So one player (whomever is "on") sets up a beginning situation for one of his characters — describing in a few sentences what's going on: setting, initial actions and goals. Then he holds up the character's face and shows it around. if it is after the first round of play, the character is likely to have some crow's-feet. Each player should let the face inform their narration. (How you do that — seeking balance or considering the prior direction a tipping point, is up to each of you on your own.) From this starting place the players will take turns contributing to narrating what happens.

There are two formats to this: narration and dialogue. Some groups do most of the play as that kind of narration. Others will want a bunch of in-character dialogue. They're both quite nice ways to play.

Narration is as simple as this: the players take turns adding one sentence (or so — one main point, anyway) to the description of actions and reactions. Go clockwise around the table. Say whatever follows most obviously from what the player before you said. Don't take a bunch of time to think of something cool — trust that it'll be most cool by just riding the collaboration. And you want to keep the game moving; keep people engaged. That's narration. (Please note, this character is revealing a story. As such, a few things can't happen in the story -- like the character's death, at least. Usually.)

When speaking for a character, if the character happens to be one of the main characters — the ones on the table, then that character is spoken for by one of her players. (The player with the same left-right relationship to the character as the player who set this situation has with his character is ideal.) If it's some other character, the first person who wants to talk for her can speak up and run with it. If no one does that, it's the first player to the left of the player who set the situation up who isn't already engaged in the current dialogue. You can shift back and forth between narrative and dialogue freely — just remember who narrated the last bit so it can pick up with the next player.

This story-telling/acting round ends when the situation is naturally resolved. This will usually be obvious, but you can also check to see when everyone agrees that there's nothing more to add. In practice, these scenes just run out of steam and then you know that it's time to move on. At this point, the two players of the character for whom the recently ended situation was authored take a moment to reflect on the outcome of the story and illustrate a crow's-foot on the character's face — on the eye closest to the player. If you think that it was a positive growth outcome, angle the crow's-foot downward. If not, then upward. If it was strongly one or the other, curve it quite a bit. If you think the event had powerful impact on the character's life, make the line you draw a little wider/darker/deeper.

When one situation is resolved, the next player (to the previous player's left) chooses one of her characters and repeats the process. Note that you could play two situations in a row for the same character — it's up to you each round. Repeat this cycle until everyone has set up and resolved a situation. At this point, each player will have "judged" and drawn two crow's-feet. Call that a round. You should play the game as many rounds as you find interesting. I'm writing this with no play-testing, so it's only a guess, but I'd hope that after three rounds you'd have an interesting assortment of crow's-feet illustrated and you'd know some things about the characters.

Facial Resources:
I'm not sure what's legal in the way of grabbing images to retouch and present here, but I also didn't want to leave you with merely a mandate to supply big faces. So here's what I'm doing. There's a list of links below that seem like good resources. Either import faces from the following links, into a graphics editor and tweak and resize them for printing or just print them so they fill the page. These should get you started — I'm particularly fond of the first site.

A site dealing with computer-composited faces
One of what must be tons of modeling sites
Another
Another composite face.

Also, the software used by that top link is available here. If you wanted to morph a few pictures together from the net so that any trace of their origin was gone and so that they would be pretty generic, this would be a good tool. I hope to find time to do this in the next few days and I'll post a face or two here if that works out. And if you do that, let me know!


If anyone has suggestions or comments, I'd love to hear them — particularly improvements to the situation-word table.

02 October 2008

Recycling old T-shirts into underwear

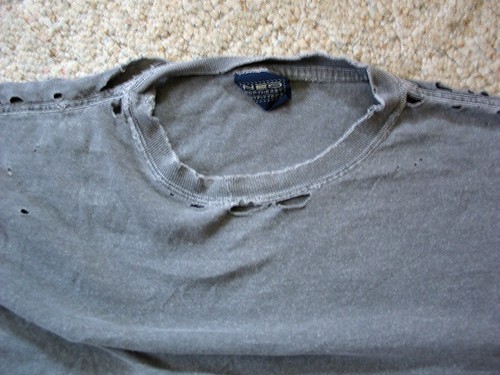
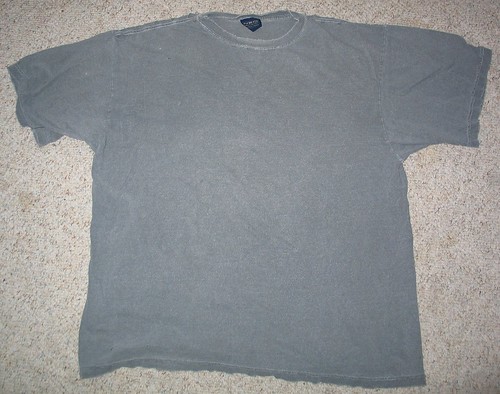
So after Chris gave me his blessing on the purchase of the new sewing machine, and then proceeded to hand me a large stack of mending, I've had to learn when to mend, and when not to. The jeans were all worth mending, but the T-shirt I found in the stack was not. It was full of holes along the shoulder seams, around the neck band, and occasional holes peppered the bodice as well.


It was ready for the rag pile, and fortunately it didn't take much convincing to get Chris to agree. The sheer volume of patches would have made it uncomfortable. He did ask that I keep the fabric to use as patches for other mending that needs to be done, and that seemed reasonable.

But then, I found the pattern review site, which for sewers, is pretty sweet: http://sewing.patternreview.com

And you know what I found? That folks over there took old T-shirts and turned them into underwear. Now that is clever, and is a pretty good way to recycle fabric. And everything I read suggests that briefs are pretty easy. So I settled on the highly regarded Kwik Sew 2334 pattern that everyone said was simple and quick.

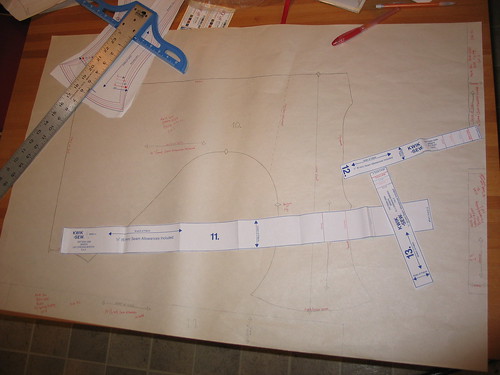
I also took another step that I've never done before - I traced the pattern onto newsprint paper, rather than trying to cut out the fabric using the original pattern. Newsprint isn't ideal, as it's not very transparent, but it worked well enough:


This pattern probably is easy, but I've never worked with knits before (let alone a limp, worn-out old cotton T-shirt), nor have I ever made any sort of pants before. I'm pretty familiar with the shapes that turn into bodices or skirts or sleeves, but pants? It's a bit like when your third grade teacher showed you one of those really weird maps of the world like this one:

. . . And then claimed that it really would cover a ball. Yeah, right. ;-)

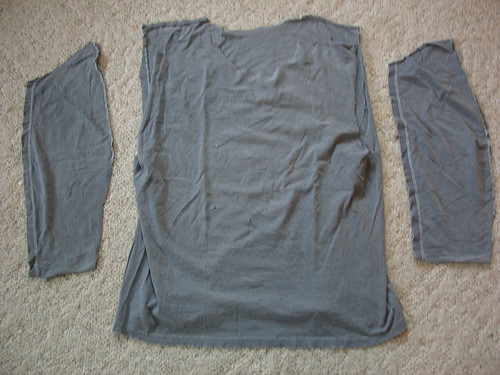
So the first step was to turn the shirt into a flat piece of fabric. First I carefully cut off the sleeves, and then cut them along their bottom seams so they would lay flat. Then I cut the shoulder seams, and removed the neckband, so that I had something like this:


This left me with the bodice, which is essentially a tube of material, with no side seams to deal with. (Excellent!) Because most of the holes peppering the T-shirt seemed to be on the front, I decided to slit the tube right up what was the front of the T-shirt, in the hopes that that would put most of the holes near the ends of the fabric, and that I could avoid them better. Cutting up the front was a happy coincidence, as I'll demonstrate later. But here it is, all spread out:

Next, I joined the sleeves together because I thought (incorrectly) that I wasn't going to have enough fabric from the bodice to cut the long thin strips of material for the leg-hole bindings. If you don't know what I'm talking about, get out a pair of briefs - look at the leg holes. See how there is a strip of fabric sewn around the opening, giving it a nice finished, and reinforced look?

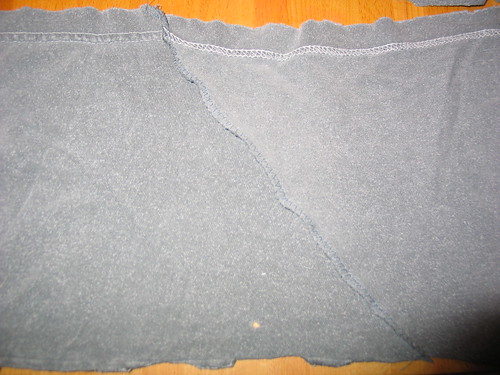
Anyway, I joined the sleeves together by laying one sleeve at a 90-degree angle to the other, and sewing diagonally across them, then cutting off the corner. When you open them back up, they form a continuous strip of cloth, with a diagonal seam in it, like this:

However, when I laid out the pattern, I discovered that that had been an unnecessary step, as the bodice was plenty big enough:


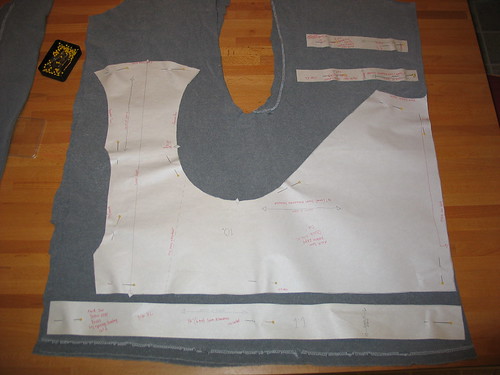
That strip along the bottom, is the leg-hole binding strip. It fit remarkably well. Also, see the U-shaped cut out at the top? That's what remains of the original arm holes. Remember when I talked about the happy coincidence? Well, here it is. If I hadn't cut the shirt down the front, I might not have been able to fit the pattern pieces so well. See how the dip in the arm hole fits into the dip in the pattern? Perfect.

The next issue I had to worry about was grain and stretch. For those non-sewers out there, grain refers to the way the fabric is woven, and it's the "up and down" direction of the fabric. Stretch refers to the side-to-side direction. If you are wearing a T-shirt (though this works with most fabrics), grab the bottom hem, and the collar and gently pull your hands farther apart, and you'll see that it will stretch a bit. It has some give, but doesn't stretch far. Now grab the bottom hem in two places, maybe 8 or 12 inches apart and pull your hands apart again. See how there's lot's of stretch? The up-and-down, non-stretchy direction is the grain, and the side-to-side very stretchy direction is the appropriately-named "stretch" of the fabric. This works for both wovens and knits, though it's much more evident in knits.

Well, guess what? Briefs and T-shirts have the grain and stretch oriented in exactly the same way! Which meant that when I laid out the pattern in the only way it could fit, the grain and stretch were correct. Another happy coincidence. If I'd laid it out incorrectly, the briefs would not stretch properly, or be comfortable. They'd be more like a tight tummy-control girdle rather than stretchy comfortable underwear. For those that don't sew, all pattern pieces are marked whether they should be oriented with the grain or the stretch of the fabric, so that you'll know which way to lay out the pieces on the uncut fabric.

Now, on to the sewing. Once the pattern was laid out and cut, I got to sewing. I'm far from an experienced seamstress. I can certainly follow a pattern, and I've made a few things. But I've never worked with knits, and it took some experimentation to find the right techniques. (There are entire books devoted to sewing with knits). Using the right needle helps, as well as making sure your machine has been cleaned and oiled recently. I also had to improvise a lot - like how in the world do you keep things even when you are sewing across a piece of fabric, rather than at an edge (use the adjustable blind hem foot, that's how!). I also did almost all of my seams using a zig-zag stitch, which is nice and stretchy and stretches with the fabric nicely.

I did find one mistake in my pattern instructions, which is shown at left.

If you don't spot it yourself - it's the third diagram down on this set of instructions. It's shaded wrong. The gray shading indicates the right side of the fabric, and the white indicates the wrong side. The third little drawing down should have the briefs shaded in gray (not white), with the fly flap that's flipped over the top done in white (as it's shown).

This was the first time I've ever spotted a mistake in a pattern before, and given my inexperience with sewing pants, it was very confusing. Other than that, the Kwik Sew pattern was great to work with. The pattern was printed on white paper that's a little more substantial than the brownish tissue I'm used to in Simplicty patterns. The instructions were also nice and clear aside from the mistake.

They turned out OK, though I think I messed up the fly a little - it's rather floppy, more so than it should be (see the final picture at the end of the article). I also have a bunch of sloppy seams and other amateurish mistakes. At least one seam looks like it was sewn by a drunk. I figured out what foot to use for all the other seams, which look a lot better.

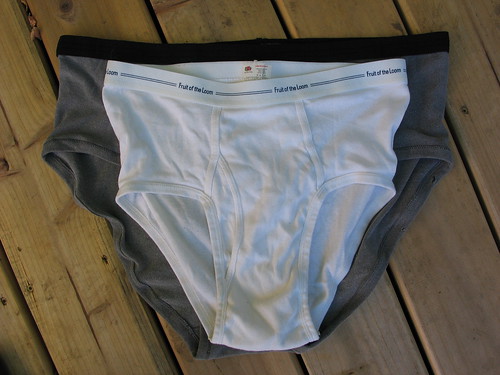
But the real problem came when I got out a pair of Chris's RTW (that's ready-to-wear, AKA "store bought" for those non-sewers out there) briefs.

Uh, oh.

I measured Chris, and he has a 42.5" waist, and according to the pattern, he should wear an extra large, which is what I made. Chris's store bought briefs are a size large (not XL), and are tiny compared to the ones I made.

Chris tried them on, and found them very comfortable due to the softer fabric that I used, and while he can wear them (I was surprised that they'd even stay up, but they do), they don't fit well. For one thing, they fit loosely, rather than snugly, which is no surprise. The leg holes also gape in the back. He's going to wear them -- he's awfully sweet about this -- but I'm definitely making a large the next time.

But in the end, we went from this:


To this:


It was a fun little project.