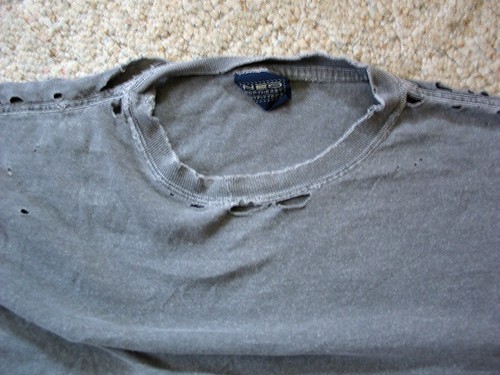
It was ready for the rag pile, and fortunately it didn't take much convincing to get Chris to agree. The sheer volume of patches would have made it uncomfortable. He did ask that I keep the fabric to use as patches for other mending that needs to be done, and that seemed reasonable.
But then, I found the pattern review site, which for sewers, is pretty sweet: http://sewing.patternreview.com
And you know what I found? That folks over there took old T-shirts and turned them into underwear. Now that is clever, and is a pretty good way to recycle fabric. And everything I read suggests that briefs are pretty easy. So I settled on the highly regarded Kwik Sew 2334 pattern that everyone said was simple and quick.
I also took another step that I've never done before - I traced the pattern onto newsprint paper, rather than trying to cut out the fabric using the original pattern. Newsprint isn't ideal, as it's not very transparent, but it worked well enough:
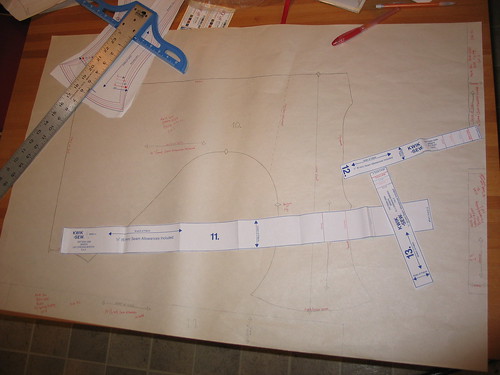
This pattern probably is easy, but I've never worked with knits before (let alone a limp, worn-out old cotton T-shirt), nor have I ever made any sort of pants before. I'm pretty familiar with the shapes that turn into bodices or skirts or sleeves, but pants? It's a bit like when your third grade teacher showed you one of those really weird maps of the world like this one:
So the first step was to turn the shirt into a flat piece of fabric. First I carefully cut off the sleeves, and then cut them along their bottom seams so they would lay flat. Then I cut the shoulder seams, and removed the neckband, so that I had something like this:

This left me with the bodice, which is essentially a tube of material, with no side seams to deal with. (Excellent!) Because most of the holes peppering the T-shirt seemed to be on the front, I decided to slit the tube right up what was the front of the T-shirt, in the hopes that that would put most of the holes near the ends of the fabric, and that I could avoid them better. Cutting up the front was a happy coincidence, as I'll demonstrate later. But here it is, all spread out:
 Next, I joined the sleeves together because I thought (incorrectly) that I wasn't going to have enough fabric from the bodice to cut the long thin strips of material for the leg-hole bindings. If you don't know what I'm talking about, get out a pair of briefs - look at the leg holes. See how there is a strip of fabric sewn around the opening, giving it a nice finished, and reinforced look?
Anyway, I joined the sleeves together by laying one sleeve at a 90-degree angle to the other, and sewing diagonally across them, then cutting off the corner. When you open them back up, they form a continuous strip of cloth, with a diagonal seam in it, like this:

However, when I laid out the pattern, I discovered that that had been an unnecessary step, as the bodice was plenty big enough:
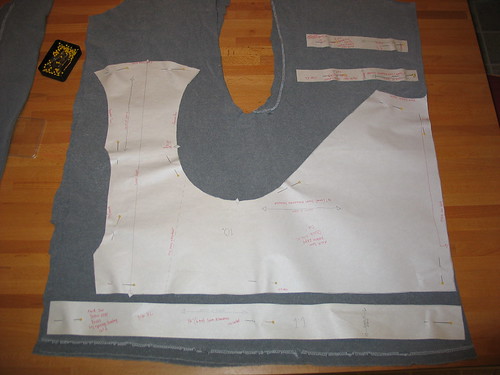
That strip along the bottom, is the leg-hole binding strip. It fit remarkably well. Also, see the U-shaped cut out at the top? That's what remains of the original arm holes. Remember when I talked about the happy coincidence? Well, here it is. If I hadn't cut the shirt down the front, I might not have been able to fit the pattern pieces so well. See how the dip in the arm hole fits into the dip in the pattern? Perfect.
The next issue I had to worry about was grain and stretch. For those non-sewers out there, grain refers to the way the fabric is woven, and it's the "up and down" direction of the fabric. Stretch refers to the side-to-side direction. If you are wearing a T-shirt (though this works with most fabrics), grab the bottom hem, and the collar and gently pull your hands farther apart, and you'll see that it will stretch a bit. It has some give, but doesn't stretch far. Now grab the bottom hem in two places, maybe 8 or 12 inches apart and pull your hands apart again. See how there's lot's of stretch? The up-and-down, non-stretchy direction is the grain, and the side-to-side very stretchy direction is the appropriately-named "stretch" of the fabric. This works for both wovens and knits, though it's much more evident in knits.
Well, guess what? Briefs and T-shirts have the grain and stretch oriented in exactly the same way! Which meant that when I laid out the pattern in the only way it could fit, the grain and stretch were correct. Another happy coincidence. If I'd laid it out incorrectly, the briefs would not stretch properly, or be comfortable. They'd be more like a tight tummy-control girdle rather than stretchy comfortable underwear. For those that don't sew, all pattern pieces are marked whether they should be oriented with the grain or the stretch of the fabric, so that you'll know which way to lay out the pieces on the uncut fabric.
 Now, on to the sewing. Once the pattern was laid out and cut, I got to sewing. I'm far from an experienced seamstress. I can certainly follow a pattern, and I've made a few things. But I've never worked with knits, and it took some experimentation to find the right techniques. (There are entire books devoted to sewing with knits). Using the right needle helps, as well as making sure your machine has been cleaned and oiled recently. I also had to improvise a lot - like how in the world do you keep things even when you are sewing across a piece of fabric, rather than at an edge (use the adjustable blind hem foot, that's how!). I also did almost all of my seams using a zig-zag stitch, which is nice and stretchy and stretches with the fabric nicely.
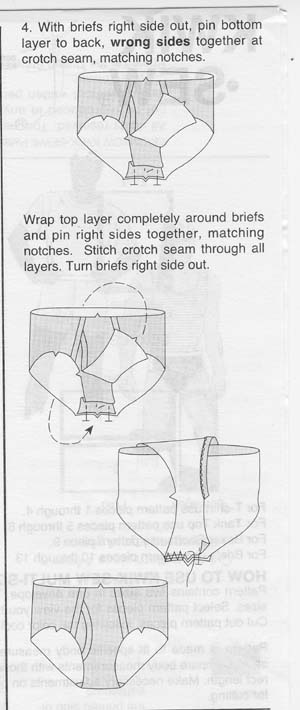
I did find one mistake in my pattern instructions, which is shown at left.
If you don't spot it yourself - it's the third diagram down on this set of instructions. It's shaded wrong. The gray shading indicates the right side of the fabric, and the white indicates the wrong side. The third little drawing down should have the briefs shaded in gray (not white), with the fly flap that's flipped over the top done in white (as it's shown).
This was the first time I've ever spotted a mistake in a pattern before, and given my inexperience with sewing pants, it was very confusing. Other than that, the Kwik Sew pattern was great to work with. The pattern was printed on white paper that's a little more substantial than the brownish tissue I'm used to in Simplicty patterns. The instructions were also nice and clear aside from the mistake.
They turned out OK, though I think I messed up the fly a little - it's rather floppy, more so than it should be (see the final picture at the end of the article). I also have a bunch of sloppy seams and other amateurish mistakes. At least one seam looks like it was sewn by a drunk. I figured out what foot to use for all the other seams, which look a lot better.
But the real problem came when I got out a pair of Chris's RTW (that's ready-to-wear, AKA "store bought" for those non-sewers out there) briefs.
Uh, oh.
I measured Chris, and he has a 42.5" waist, and according to the pattern, he should wear an extra large, which is what I made. Chris's store bought briefs are a size large (not XL), and are tiny compared to the ones I made.
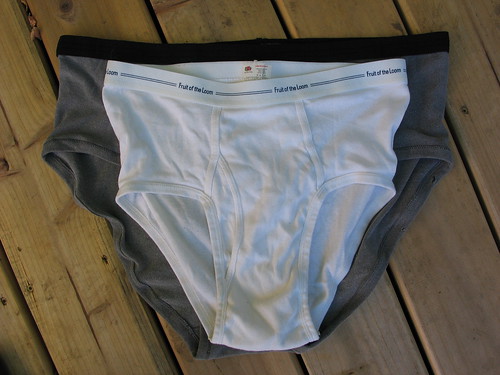 Chris tried them on, and found them very comfortable due to the softer fabric that I used, and while he can wear them (I was surprised that they'd even stay up, but they do), they don't fit well. For one thing, they fit loosely, rather than snugly, which is no surprise. The leg holes also gape in the back. He's going to wear them -- he's awfully sweet about this -- but I'm definitely making a large the next time.
But in the end, we went from this:
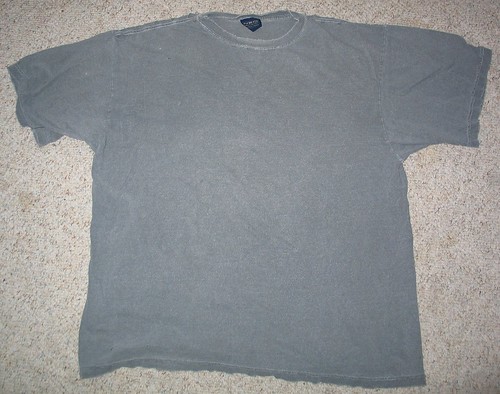
To this:

It was a fun little project.
5 comments:
Very cool!!! Such a great way to recycle a worn out t-shirt!
That is amazing! You are an excellent writer by the way!
Thanks, guys!
I think you did a great job and should give a workshop at Bioneers. People should see how even an admitted beginner can make great undies!
great tutorial! I love it when everything comes together and you're left with hardly any scraps!!
Post a Comment