06 October 2008

Crow's-Feet: A Story-Games Contest Response

I occasionally design games in response to online contests. Some people do it often and produce great stuff. That's not me, but it's still fun. I wasn't really in the make-a-game mode, but something about Jonathan's post at SG kept rattling around in my head and out came the following. I think it's playable in an hour -- even if some people would take longer, I'll try it out and see how it works. I guess I've disregarded the rule about no writing implements at the table — I kind of forgot about that while the idea flowed out of me. I think I'll leave it like that rather than implement some inane replacement like pressing the crow's-feet into aluminum foil with your finger-nail. Also, when I started, I'd kind of expected the graphical role of the illustrated crow's-feet to have a more numeric role in resolution or something but that's not how it worked out.


Crow's-feet
-any of the tiny wrinkles at the outer corners of the eyes resulting from age

Players are expected to be sitting around a table or something. There are the same number of characters as there are players but each character resides between two adjacent players who share it — so that each player has two characters and each character has two players. Each character is represented at the table by a youthful, cut-out face. (To generate these, take pictures, tear them out of magazines, find them on the net, draw them up, use my templates below, whatever.)

These characters that you'll be playing with were in more or less the same clique in high school, twenty years ago. Maybe they're still friends and maybe not. Probably not really; but y'know, friendly. It's a funny time in their lives because high school graduation was such a significant milestone and now they've lived more life after that point than before. And they've seen quite a bit and really lived their lives for a while. Experiences have left tracks on the characters. They've aged.

Aging has good parts and bad and different people react and emphasize these aspect differently. And I think that the way we handle these things has some impact on the way we age. Take crow's-feet; maybe this is myth — though for purposes of this game it isn't: when you laugh and smile a lot, you develop wrinkles radiating out from your eyes in a generally downward direction and when you scowl more, your crow's-feet point more out and up. That's how you'll be recording the story of the characters — by illustrating their crow's-feet. And by calling on those illustrations to influence more of their stories.

So now you're sitting around the table with some friends and you have these cut-out faces lying on the table's surface between you and your neighbors...now what? Grab a fine-point sharpie (or whatever) and the character's face to your right. Write her first name on her forehead — way up high, and put her back on the table. Someone has to start — let's say it's the oldest player. He's going to pick one of his characters and describe a bit of a situation. It'll be either historic or current for the character.

See, the setting of this game is like this: It's late on the evening of their twentieth class reunion — after things have shut down and they've moved, as a group, to someone's house. They talk about the good old days, but more, they talk about Real Life; what's been going on. You're past the bullshit part of the evening and old friends have been reexamining their lives all day. Maybe they've had a few drinks. Now they're confiding.

When it's your turn, you come up with a situation of significance in the character's life; something that helped them to mature. Anything, really. But don't be trying to narrate an outcome — the group will do that collaboratively, just set something up and as play proceeds, you'll learn some cool stuff about the characters.


kidislackingsecurity
partnercausesbuildingsatisfaction
jobexacerbateslosingsufficiency
money
showingexcitement
parent
conflictedheartache
news
socialanxiety
technology

healing
body

function

You can come up with any kind of situation that will lead to significance, but if you want some help, check out this table. There are four lists of words. you can string them together, adding the occasional "not," changing the tense or form and even adding or deleting a word as you want — this is just a helper. For example, maybe you grab "money causes social satisfaction" and set up a situation in which the character, aspiring to "success" can finally buy into a country club or maybe he hires a prostitute to help fill the gaps in his lackluster marriage. Some combinations won't make perfect sense; just fix them up or choose something else.

So one player (whomever is "on") sets up a beginning situation for one of his characters — describing in a few sentences what's going on: setting, initial actions and goals. Then he holds up the character's face and shows it around. if it is after the first round of play, the character is likely to have some crow's-feet. Each player should let the face inform their narration. (How you do that — seeking balance or considering the prior direction a tipping point, is up to each of you on your own.) From this starting place the players will take turns contributing to narrating what happens.

There are two formats to this: narration and dialogue. Some groups do most of the play as that kind of narration. Others will want a bunch of in-character dialogue. They're both quite nice ways to play.

Narration is as simple as this: the players take turns adding one sentence (or so — one main point, anyway) to the description of actions and reactions. Go clockwise around the table. Say whatever follows most obviously from what the player before you said. Don't take a bunch of time to think of something cool — trust that it'll be most cool by just riding the collaboration. And you want to keep the game moving; keep people engaged. That's narration. (Please note, this character is revealing a story. As such, a few things can't happen in the story -- like the character's death, at least. Usually.)

When speaking for a character, if the character happens to be one of the main characters — the ones on the table, then that character is spoken for by one of her players. (The player with the same left-right relationship to the character as the player who set this situation has with his character is ideal.) If it's some other character, the first person who wants to talk for her can speak up and run with it. If no one does that, it's the first player to the left of the player who set the situation up who isn't already engaged in the current dialogue. You can shift back and forth between narrative and dialogue freely — just remember who narrated the last bit so it can pick up with the next player.

This story-telling/acting round ends when the situation is naturally resolved. This will usually be obvious, but you can also check to see when everyone agrees that there's nothing more to add. In practice, these scenes just run out of steam and then you know that it's time to move on. At this point, the two players of the character for whom the recently ended situation was authored take a moment to reflect on the outcome of the story and illustrate a crow's-foot on the character's face — on the eye closest to the player. If you think that it was a positive growth outcome, angle the crow's-foot downward. If not, then upward. If it was strongly one or the other, curve it quite a bit. If you think the event had powerful impact on the character's life, make the line you draw a little wider/darker/deeper.

When one situation is resolved, the next player (to the previous player's left) chooses one of her characters and repeats the process. Note that you could play two situations in a row for the same character — it's up to you each round. Repeat this cycle until everyone has set up and resolved a situation. At this point, each player will have "judged" and drawn two crow's-feet. Call that a round. You should play the game as many rounds as you find interesting. I'm writing this with no play-testing, so it's only a guess, but I'd hope that after three rounds you'd have an interesting assortment of crow's-feet illustrated and you'd know some things about the characters.

Facial Resources:
I'm not sure what's legal in the way of grabbing images to retouch and present here, but I also didn't want to leave you with merely a mandate to supply big faces. So here's what I'm doing. There's a list of links below that seem like good resources. Either import faces from the following links, into a graphics editor and tweak and resize them for printing or just print them so they fill the page. These should get you started — I'm particularly fond of the first site.

A site dealing with computer-composited faces
One of what must be tons of modeling sites
Another
Another composite face.

Also, the software used by that top link is available here. If you wanted to morph a few pictures together from the net so that any trace of their origin was gone and so that they would be pretty generic, this would be a good tool. I hope to find time to do this in the next few days and I'll post a face or two here if that works out. And if you do that, let me know!


If anyone has suggestions or comments, I'd love to hear them — particularly improvements to the situation-word table.

02 October 2008

Recycling old T-shirts into underwear

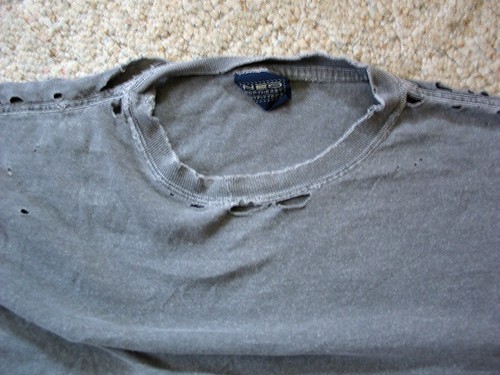
So after Chris gave me his blessing on the purchase of the new sewing machine, and then proceeded to hand me a large stack of mending, I've had to learn when to mend, and when not to. The jeans were all worth mending, but the T-shirt I found in the stack was not. It was full of holes along the shoulder seams, around the neck band, and occasional holes peppered the bodice as well.


It was ready for the rag pile, and fortunately it didn't take much convincing to get Chris to agree. The sheer volume of patches would have made it uncomfortable. He did ask that I keep the fabric to use as patches for other mending that needs to be done, and that seemed reasonable.

But then, I found the pattern review site, which for sewers, is pretty sweet: http://sewing.patternreview.com

And you know what I found? That folks over there took old T-shirts and turned them into underwear. Now that is clever, and is a pretty good way to recycle fabric. And everything I read suggests that briefs are pretty easy. So I settled on the highly regarded Kwik Sew 2334 pattern that everyone said was simple and quick.

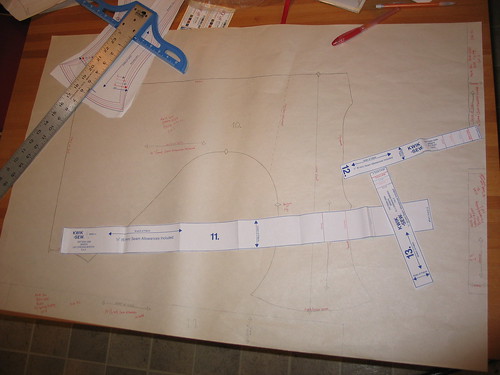
I also took another step that I've never done before - I traced the pattern onto newsprint paper, rather than trying to cut out the fabric using the original pattern. Newsprint isn't ideal, as it's not very transparent, but it worked well enough:


This pattern probably is easy, but I've never worked with knits before (let alone a limp, worn-out old cotton T-shirt), nor have I ever made any sort of pants before. I'm pretty familiar with the shapes that turn into bodices or skirts or sleeves, but pants? It's a bit like when your third grade teacher showed you one of those really weird maps of the world like this one:

. . . And then claimed that it really would cover a ball. Yeah, right. ;-)

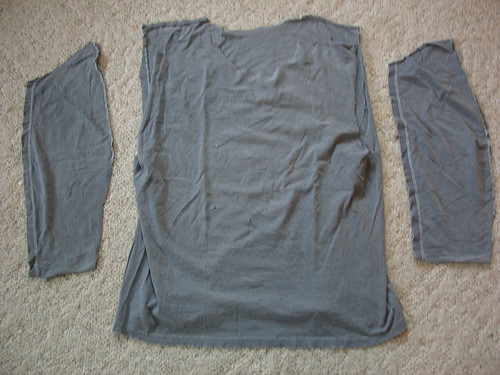
So the first step was to turn the shirt into a flat piece of fabric. First I carefully cut off the sleeves, and then cut them along their bottom seams so they would lay flat. Then I cut the shoulder seams, and removed the neckband, so that I had something like this:


This left me with the bodice, which is essentially a tube of material, with no side seams to deal with. (Excellent!) Because most of the holes peppering the T-shirt seemed to be on the front, I decided to slit the tube right up what was the front of the T-shirt, in the hopes that that would put most of the holes near the ends of the fabric, and that I could avoid them better. Cutting up the front was a happy coincidence, as I'll demonstrate later. But here it is, all spread out:

Next, I joined the sleeves together because I thought (incorrectly) that I wasn't going to have enough fabric from the bodice to cut the long thin strips of material for the leg-hole bindings. If you don't know what I'm talking about, get out a pair of briefs - look at the leg holes. See how there is a strip of fabric sewn around the opening, giving it a nice finished, and reinforced look?

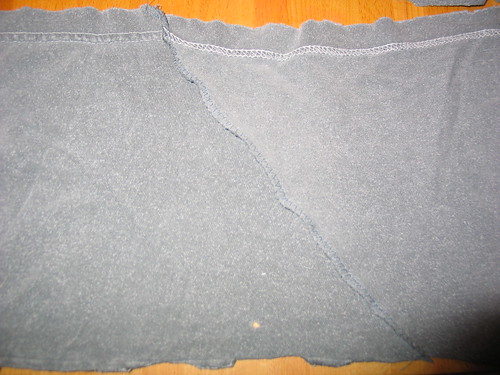
Anyway, I joined the sleeves together by laying one sleeve at a 90-degree angle to the other, and sewing diagonally across them, then cutting off the corner. When you open them back up, they form a continuous strip of cloth, with a diagonal seam in it, like this:

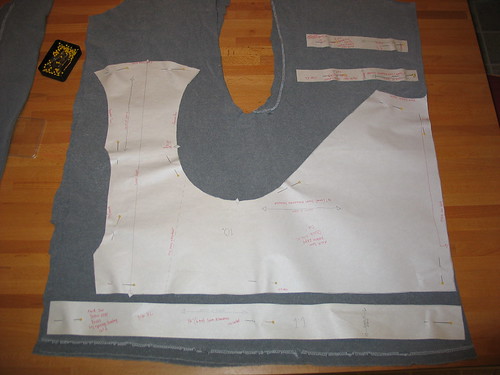
However, when I laid out the pattern, I discovered that that had been an unnecessary step, as the bodice was plenty big enough:


That strip along the bottom, is the leg-hole binding strip. It fit remarkably well. Also, see the U-shaped cut out at the top? That's what remains of the original arm holes. Remember when I talked about the happy coincidence? Well, here it is. If I hadn't cut the shirt down the front, I might not have been able to fit the pattern pieces so well. See how the dip in the arm hole fits into the dip in the pattern? Perfect.

The next issue I had to worry about was grain and stretch. For those non-sewers out there, grain refers to the way the fabric is woven, and it's the "up and down" direction of the fabric. Stretch refers to the side-to-side direction. If you are wearing a T-shirt (though this works with most fabrics), grab the bottom hem, and the collar and gently pull your hands farther apart, and you'll see that it will stretch a bit. It has some give, but doesn't stretch far. Now grab the bottom hem in two places, maybe 8 or 12 inches apart and pull your hands apart again. See how there's lot's of stretch? The up-and-down, non-stretchy direction is the grain, and the side-to-side very stretchy direction is the appropriately-named "stretch" of the fabric. This works for both wovens and knits, though it's much more evident in knits.

Well, guess what? Briefs and T-shirts have the grain and stretch oriented in exactly the same way! Which meant that when I laid out the pattern in the only way it could fit, the grain and stretch were correct. Another happy coincidence. If I'd laid it out incorrectly, the briefs would not stretch properly, or be comfortable. They'd be more like a tight tummy-control girdle rather than stretchy comfortable underwear. For those that don't sew, all pattern pieces are marked whether they should be oriented with the grain or the stretch of the fabric, so that you'll know which way to lay out the pieces on the uncut fabric.

Now, on to the sewing. Once the pattern was laid out and cut, I got to sewing. I'm far from an experienced seamstress. I can certainly follow a pattern, and I've made a few things. But I've never worked with knits, and it took some experimentation to find the right techniques. (There are entire books devoted to sewing with knits). Using the right needle helps, as well as making sure your machine has been cleaned and oiled recently. I also had to improvise a lot - like how in the world do you keep things even when you are sewing across a piece of fabric, rather than at an edge (use the adjustable blind hem foot, that's how!). I also did almost all of my seams using a zig-zag stitch, which is nice and stretchy and stretches with the fabric nicely.

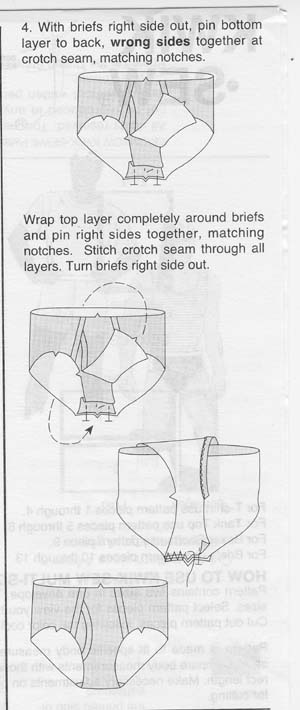
I did find one mistake in my pattern instructions, which is shown at left.

If you don't spot it yourself - it's the third diagram down on this set of instructions. It's shaded wrong. The gray shading indicates the right side of the fabric, and the white indicates the wrong side. The third little drawing down should have the briefs shaded in gray (not white), with the fly flap that's flipped over the top done in white (as it's shown).

This was the first time I've ever spotted a mistake in a pattern before, and given my inexperience with sewing pants, it was very confusing. Other than that, the Kwik Sew pattern was great to work with. The pattern was printed on white paper that's a little more substantial than the brownish tissue I'm used to in Simplicty patterns. The instructions were also nice and clear aside from the mistake.

They turned out OK, though I think I messed up the fly a little - it's rather floppy, more so than it should be (see the final picture at the end of the article). I also have a bunch of sloppy seams and other amateurish mistakes. At least one seam looks like it was sewn by a drunk. I figured out what foot to use for all the other seams, which look a lot better.

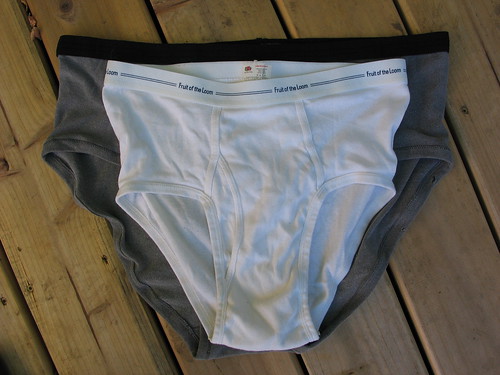
But the real problem came when I got out a pair of Chris's RTW (that's ready-to-wear, AKA "store bought" for those non-sewers out there) briefs.

Uh, oh.

I measured Chris, and he has a 42.5" waist, and according to the pattern, he should wear an extra large, which is what I made. Chris's store bought briefs are a size large (not XL), and are tiny compared to the ones I made.

Chris tried them on, and found them very comfortable due to the softer fabric that I used, and while he can wear them (I was surprised that they'd even stay up, but they do), they don't fit well. For one thing, they fit loosely, rather than snugly, which is no surprise. The leg holes also gape in the back. He's going to wear them -- he's awfully sweet about this -- but I'm definitely making a large the next time.

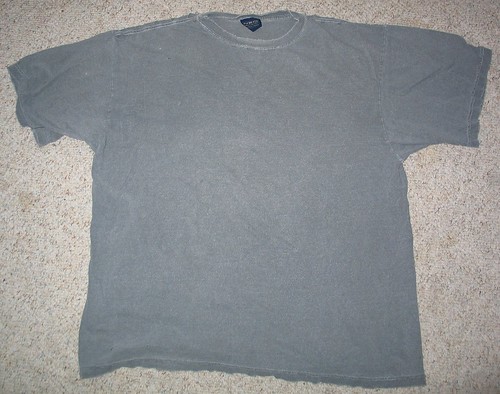
But in the end, we went from this:


To this:


It was a fun little project.

25 September 2008

Make the World a Better Place

Cathy and I have been increasingly discussing how we can make the world a better place. Y'know, we're nobody...what can we do?!? Well, the answer is nothing -- at least if you don't try. So, these ideas that we come up with; what can we do with them? We need to catalog them and share them and solicit other ideas from other people. So we are. Right over here.

Please feel encouraged to stop by, read, let us know what you think, suggest ideas to us or maybe even write a guest column. :)

Darning Jeans

I got a new sewing machine just after the Labor Day holiday, and I have spent the last week learning how to mend jeans using the buttonhole foot, and a special darning stitch. I set the machine over a hole and start sewing, and it moved the fabric evenly back and forth for me. See my previous blog post about the new machine (Janome HT2008), or read about it on the Janome site.

Note: You can click on any of the photos to get a closer look.


Not all sewing machines do it automatically the way mine does, but many Janome models do, and other brands probably do as well. If you have a sewing machine, check to see if your machine does something similar, and if it doesn't, you can do it freehand (you move the fabric back and forth by hand) using a straight stitch and an actual darning foot (mine is actually the buttonhole foot). But that takes more skill and practice than the automatic darning feature.

Darning is a bit different than just patching a hole, and shows a lot less than patching does. It actually uses thread to cover a hole - almost as if you've re-woven the missing fabric out of thread. And if you do it right, it's nearly invisible. The downside is that patching might be slightly more comfortable (though we haven't found that darning the jeans is uncomfortable).

There are a few key components to darning jeans:
  1. Matching the thread. You must get it as close as possible to the color of the jeans. If it's not the exact shade, getting a thread that is slightly lighter is better than if it's slightly darker. A small spool of thread costs about $2.50 USD.
  2. Matching the patch, if using. Bigger holes (larger than .7cm) require a small piece of fabric to support the new thread. The patch should ALSO be as close to the color of the fabric as possible, and as with the thread, going ever so slightly lighter is better than going darker. An eighth of a yard of fabric rarely costs more than a dollar or two.
  3. A washable fabric glue stick. You use it to hold the patch in place while you are darning. It costs around $3, and lasts a LONG time.
When patching jeans, you normally use double-sided fusible interfacing to glue the patch to the hole. You cut the interfacing around the hole so that the interfacing can't be felt from the back of the hole. It also prevents the edges of the patch or the edges of the hole from unraveling further. I didn't like using interfacing to hold the patches on, for a couple of reasons. It leaves the patch rather stiff. It wasn't really uncomfortable, but that spot never really conforms to your skin the way undamaged denim does. And when you darn across a patch, the darning also leaves the patch a little stiff - there's a LOT of thread being used. So when doing a darning job, I leave out the interfacing in the hopes that eventually the repair will eventually soften, something it won't do with interfacing. I figure the thread will prevent the unraveling well enough, and that's one less layer of stiffness to make the jeans uncomfortable.

Other, less important, but worth thinking about considerations:
  1. Match the thread type with the fabric. If you are darning cotton fabric such as denim, then use an all cotton thread if possible, rather than a polyester thread. That way, as the fabric continues to fade, so too will the thread, hopefully at the same rate. However, matching the thread color is more important to me, and if I can get the exact right color, but only in a polyester thread, then I use polyester thread.
  2. Match the fiber content of the patch, with the fiber content of the garment being repaired. In other words, if you are fixing cotton jeans, then use a cotton patch. This is for the same reason as #1 above. Again, matching colors is more important to me.
This sounds complicated, but it's really not.

I had 8 pairs of jeans to repair, and 3 of them were very faded blue jeans. I took the most damaged pair, and used the fabric to repair the other two. The rest, I took to Joanne Fabrics, and found matching threads and patching fabrics. I think the materials were about $15 to repair 5 pairs of jeans.

Then, follow these steps:

  1. Cut patches for the holes. I make the patches squares or rectangles only. Cut the patch so that it extends at least 1/2 an inch past any edge of the hole. Bigger is better than smaller, because if you don't make it big enough, it's easy to catch and scrunch up the edge of the patch, making a hard lump underneath the fabric. If the diameter of the hole is less than .7 cm, I skip this step entirely. That's about the same size as the width of my pinkie finger at the tip, and is the widest the darning foot will accommodate in one pass. I also do NOT trim the frayed edges if I'm skipping the step - the fraying fabric will help support the darn.
  2. Glue the patch behind the hole on the inside of the garment. I use a washable fabric glue stick. Avoid getting the glue on the center of the patch, where it covers the hole. Wait about 5 minutes for it to set.
  3. Darn the hole using the #9 stitch (shown) and the buttonhole foot. You open out the back of the foot as far as it will go, and you do NOT pull down the buttonhole size sensor for the machine. You position the needle so it's at the lower left corner of the hole, maybe 1/2 a centimeter away from the edge. Do as many passes as you need to, to completely cover the hole and edges of the hole. When done, you can turn it 90 degrees and go over it again, if desired. If the hole is small enough to not use a patch, I try and center it just so. You can also shorten the darning pass for smaller holes.
  4. Remove the jeans from the machine, and trim your threads close to the fabric surface. I then turn the jeans to the inside, and trim the edges of the patch close to where the stitching begins.
Not including the trip to the fabric store, the entire process takes no more than 10-15 minutes per hole. (Well, at least that's how long it took me after I figured out how to do it. The first few tries took longer). And as long as I've done a good job matching everything, the repairs are remarkably hard to see. Not invisible, but only noticeable if you are looking for the spots. I've also found that the process is more invisible on blue jeans, than on other colors of jeans. The reason is that blue jeans are made of two colors of thread in the weaving process - white in one direction, blue in the other, giving the jeans a slightly variegated appearance. That variegation does a better job hiding the repair work (Think about it, what kind of carpet shows all the dirt or crud on it - a matte style, or a speckled style?). Chris has pairs of jeans in black, brown, tan, and olive, and the threads used to weave those denims tend to all be one color. It's even MORE important to match your thread and patch colors when darning jeans that aren't the standard blue.

The step-by-step photos above document a mediocre thread- and patch-matching job. (It was because of that particular pair of jeans that I got MUCH more careful when choosing colors.) The repairs are clearly noticeable. But the poor choice turned out to be advantageous - the repairs do show up nicely in the photos. Below, are some examples where the thread matched nicely.


To put things into perspective - I put 6 pairs of Chris's jeans back into circulation. To have bought them new would have cost $35 x 6= $210. The cost of the sewing machine was $350. It hasn't quite paid for itself, but it has certainly helped. And there are cheaper machines available that can do the same thing. The cheapest machines wouldn't do this automatically, but you could still do it with a darning foot and freehand darning with a straight stitch (though that takes some practice to get right).

I got a new sewing machine


Back in the mid 1970s, my mother spent an ungodly amount of money on the very first electronic sewing machine. It cost about $1200, and was the Singer Athena 2000. Evidently it was the machine to have. As someone on a sewing message board told me, "I remember when she came out and was the absolute last word in a machine in her day. So revolutionary." I was 5 or 6 years old when Mom got it, and I even used it a little bit growing up - enough that I actually knew how to thread it, though I can't claim to have learned to actually sew.

Mom upgraded to a used Bernina when I was in my late 20s or early 30s, and I just couldn't understand why. What was wrong with the Singer? But, I wasn't going to complain, as she gave me the Singer. It sat around for years - maybe six years - without getting much use ... I think my husband and I dragged it along on two cross-country moves before I ever gave sewing a serious try. But, it came with a sewing table/cabinet and every conceivable accessory (Mom was an avid and talented seamstress), so I was hesitant about replacing it.

I started sewing, and have been sewing somewhat more seriously for about two or three years now. I've made a couple of nightgowns, three capes and Halloween costumes, a dress, and a shirt for my daughter, a bathrobe for my husband and several doll quilts. I've also made valentines for my kids - my daughter got a small puffy heart-shaped pillow, and I made heart-shaped juggling bean bags for my stepson (made from red, white and black bandanna fabric with hearts and flaming skulls).

But the Singer was giving me problems. First, it really handled slippery flimsy fabrics poorly, and to date, I've made two Halloween costumes out of that sort of fabric. Skipped stitches, distorted decorative stitches, you name it. It also had a terrible tendency to suck any kind of thin fabric down into the throat plate, despite using the appropriate needle, and a straight-stitch throat plate (for those of you who don't sew - the throat plate is the small metal plate under the fabric, with a hole in it. The needle goes up and down into that hole. A straight stitch plate has a tiny hole not much bigger than a needle. It's maybe 1 mm in diameter, and it's harder for fabric to be pulled down in there. An all-purpose plate has an oblong hole, maybe 8 mm across, to accommodate stitches like zig-zag stitches, where the needle comes down on the left side and then the right).

Then after 30+ years of often heavy use, the machine was no longer reliable. It would suddenly refuse to stitch anything without forming horrible knots, suck ALL fabrics down into the bobbin area, and jam, and nothing I did - from changing needles, threads, fabrics, and re-threading would make it work. So I'd haul it up to my sewing machine repair guy, and he'd tinker with it for a few minutes for free, get it working again, and I'd go home to start sewing again. This happened three times in a row, right at the beginning of new projects. My repair guy is a nice man, but frankly, I had to drive 30-45 minutes each way, and I was getting tired of it. He also warned me that if the circuit boards went bad, it would be either very, very expensive, or impossible to repair. The boards aren't made anymore, and haven't been for years, so repair guys collect the machines to use for parts. Repairs to that part would run in the hundreds of dollars, if they could be made at all.

A year or two ago, I had asked at a local quilt shop what kind of machines they recommended, and they had given me an unhesitating and wholehearted recommendation for a Janome, just about any Janome. She felt they were reliable and easy to use. I had never heard of Janome (pronounced Juh-NO-mee), but I found out later that they were a Japanese company. I was interested in a Bernina of course, as lots of people (including my Mom) consider them the Cadillac of sewing machines. But the Swiss-made Berninas that I could afford were either new and the lowest end mechanical models, or used but so old, they didn't have the modern features I wanted. My mom's machine was a used Bernina 1130, and it was a nice machine that I could have been quite happy with, but even a 20 year old model like hers (it was made in the mid 1980s) now retails for around $1000. That's just too expensive for me at this time.

When my Singer finked out AGAIN, a friend loaned me a $70 Brother purchased at Walmart. It wasn't a great machine, but frankly, it handled the slippery, flimsy fabric FAR better than my high-end, but old machine ever did. Like night and day. But it was loud, and had none of the more modern features that I wanted. I didn't put it through its paces, but I doubt it could handle multiple layers of heavy fabrics well. That was the last straw. I had found out what a joy it was to sew on a good machine (my mother's 20-year-old Bernina), and then when a cheap machine handled a fabric BETTER than the Singer did....

So, I did some research on Janomes and liked what I saw. No one really had anything bad to say. I also saw a model called the Janome HT2008, which was quite flexible - good for nearly any kind of sewing project - quilting, home decor, and clothing, and had plenty of modern features, and 50 stitches both decorative and utility. The average price paid was around $350.

The next day, I went to my repair guy, and brought him my machine, which he again tinkered with and got running again. I asked him point blank, "Can you make this machine reliable?" And he said "You can keep it running for a few more years, but no, not really." And I said "so what's the equivalent machine in a new Janome? And he said, "look at the heart machine." He didn't have any used machines that I wanted that were in my price range (they were all too expensive!), so I tried out the "heart machine." It's a Janome HT2008 (the same model I'd read about the night before). The HT stands for "Heart's Truth" and it's a limited edition machine meant to raise awareness of heart disease in women. I tried it out, and bought it on the spot. It was $350, but Kurt gave me $30 in trade for the Singer. To put the price in perspective, I saw one new Janome that retails for $8000. I also get unlimited free lessons on how to use the features the machine offers (I've had two lessons so far).

It's got lots of great features, which you can read about it here:
Janome's web page and Brochure.

So then I took it home, a bit nervous about what Chris would say. We usually talk to each other when making big purchases like this, and I hadn't talked about it with him at all. While it wasn't exactly a whim, it wasn't far from it! But he was really great about it. He felt that it was a good thing for the household to have, and so the household paid for 1/2 of the machine, and the rest is coming out of my allowance (we both get some money each month to spend as we like). He then gave me a wicked look, and handed me a stack of jeans he'd been saving for at least 6 years and asked me to patch the holes in them. Gulp. I couldn't well refuse since a) I have the time, and b) he really was great about me buying the machine, with money so tight.

I still have the cabinet that came with the Singer, and I'm currently using it with my Janome, which fits in the cabinet perfectly. However, I don't have a bolt that fits the bottom of the Janome, and one would have to be special ordered in the right size and threading. If I did that, I'd just drill a new hole in the bottom of the cabinet. No problem - it wouldn't even show. But, as I don't have a bolt, I can't collapse the machine into the cabinet when not in use. The cabinet has a platform that's below the surface of the table, so that the machine sits down below a bit, with the sewing surface itself flush with the table. Then, when you want to put the machine away, you lift up on the platform to release it, and it tilts down at 90 degrees, and the machine dangles on its side underneath (see why a bolt is needed?). Then you flip the extended table surface up and then down on top of the hole. It's open on the underside though, so if you crouch down under the table, you can see the machine.

This is a problem for two reasons:
  1. I have a cat named Squeaky that LOVES thread, and he will, if I leave the machine out with thread on it, grab the thread and spiderweb it all around the room, and also try to eat it. That's a health hazzard for a cat, and he's already been rushed to the vet once, to have his hind legs untangled from the thread he'd dragged out (he was OK, fortunately). But he was so freaked out, biting and scratching, that I couldn't release him by myself. The open bottom is unacceptably insecure, as it doesn't keep the thread out of his reach.
  2. The machine (like most sewing machines) has what is called a "free arm". You can take part of the base off, which makes it really small. This is great when hemming pants or cuffs. You put the fabric tube AROUND the base of the machine. I do use that feature. On the Singer, I had to collapse the sewing surface to access the free arm, but because the machine was bolted in place, I had to lift up the front panel of the cabinet, collapse the machine's surface, and then sew with my arms OVER that front panel, reaching behind and below it. It was like sewing in a hole. It was a pain in the butt. I suppose I could have unbolted it, and lifted it up to the top surface but that's a huge hassle, too.
Mom's new cabinet has a "lift". You push down on the platform supporting the machine and it lifts up on some sort of hydraulic mechanism, rather than swinging or tilting up. And it's got three positions - Machine fully below the surface of table, Machine partially up, so the sewing surface is flush with the table, and all the way up, so you can access the free arm. The cabinet also fully encloses the sewing machine when not use, protecting it from kitty curiosity and fur. I want one lots and lots, but it's another $350 for a cheap one, and I'm making do with the old one for now.

I'm terrified that somehow someone will hit the mechanism that releases the cabinet platform, and the machine will fall through, but I doubt it's likely. And to put the machine away, I have to either lift the machine up and out of the cabinet, and then collapse the cabinet and store the machine on the floor, OR I leave the cabinet open, and cover the machine with a hard plastic sewing machine case that I bought. I do the latter when I'm just going to pausing for a short time to keep Squeaky from the thread. I'll pack up the machine in the case, and fold up the table, when I'm on one of my longer sewing hiatuses.

I've been sewing on it for nearly a month now, and I really, really like the machine. It's quiet, far more powerful than my old machine and a joy to use. My only negatives are that I find the markings on the throat plate hard to interpret (all Janomes have this same problem - it has both centimeter and 1/8th inch markings, and it's hard to tell which is which), and the machine doesn't have adjustable presser-foot pressure (the one and only feature the old machine had that this one doesn't). I'll get used to the former, and the latter mostly doesn't matter. I didn't change the pressure all that often on the old machine either.

Oh, did I mention the Janome has a darning stitch? You use with the buttonholer, and it darns holes pretty nicely, and I've (as promised) repaired several pairs of Chris's jeans with it, and the repairs are nearly invisible. But that's a subject for another post!

11 September 2008

Spore: six hours in

I preordered Spore from Amazon in December of 2007. It arrived yesterday. I'm talking here about my impressions.

OK, first, I have only six hours of play time in on Spore, so really, these are just first impressions. I’ve played through the first three stages and am poised to begin the civilization stage. My review of it, I’ve come to realize as I wrote the below, is unapologetically positive. I realized, of course, that I was having fun playing, but now I realize that I love the game. It has shortcomings – the controls are hard sometimes, but overall, I’m really enthusiastic.

The creature creators – particularly once you get into 3D (i.e. everything after the cellular stage) are really fun to just mess with. There are game-play repercussions to the choices of what you attach and where, but even without that, just seeing what you can do is awesome fun. In the end – regardless of how Spore lives up to expectations and hype, just the creative acts alone will make it worth $50 if I honestly appraise things (time and money).

At each stage, so far, the game-play changes significantly. It both gets more complex as you advance and also changes how you accomplish things. I’m playing an herbivore and that informs the choices I have throughout play.

In the beginning I was just hunting bits of green stuff and trying to avoid being prey. The way you grow and level (up through strata of the tide pool? down? Or maybe just in that you’re aware of things at a different scale but in the same space?) is a nice gimmick and the play remains the same but the graphics are rich enough that even though there’s not much to it, it’s fun and rewarding just playing the light game and looking around.

When you advance from one stage to the next, you are presented with a history of your development which focuses on what all you accomplished during the last stage but includes the whole history. It’s fun. Just looking at how your body has morphed at each “generation” is kind of neat – particularly since you remember back to how you were making decisions.

When you crawl out of the sea, new parts – arms and legs most obviously, become available. And you gain a third dimension. You can fight or befriend other nests of critters and you have some basic missions to fulfill to gain DNA points (or whatever – the currency that allows you to alter your form). And you can (and must, I think) build a pack of companions that will help you make friends or eat foes. I stumbled upon gliding wings and found that increasing my flight ability made it fast and fun to get around (and out of danger) in this stage. This is also the first area where maneuvering with the WASD keys was hard. Turning is something I still haven’t mastered. The mouse-look doesn’t work like it ought, I think.

This brings me to another realization about Spore. They give you enough guidance to steer you along the right path, but really figuring out how to play has enough holes in it that you’re figuring stuff out. (Now that I think about it, maybe the manual tells more – maybe even too much, I dunno, I only read the first page.) But, so far at least, the figuring out is nicely in what Vygotsky called my Zone of Proximal Development – which means that the learning task is stimulating and not discouraging.

In the third stage your form is fixed and the creator aspect of play involves dressing your tribe; designing their costume. It’s quite fun. The game play was pretty dull real-time strategy play. Harvest food, domesticate pets – though I’m not sure how to use them yet, make babies, outfit your tribe and assign them tools – that sort of thing. And then you can either impress and ally with other tribes or destroy them. I think your strategy at the beginning of this stage depends on what tools you start with. If not, that kind of sucks, but oh well. I befriended two and destroyed three – even with the intent to follow as pacific a course as I could. Destroying enemies is hardish. If you want to figure everything out for yourself, skip the rest of the paragraph.............The strategy that I settled on was to equip my entire tribe with burning torches and just attack their main building. You get slaughtered but suck up tons of their resources. You want to have built up a food supply first because as you die, you’re laying more eggs. Probably you got wiped out, but reproduced faster than them. So now, you outfit the tribe similarly and repeat the attack. This time you win. I actually hope it’s not as formulaic as all that, but it worked like that for me on my first game.

That’s about all I can think of to say just now. I’m having fun with it.

15 July 2008

CSA starts to fly


Two weeks ago I noted what our haul from our local CSA was. I just got back with the next box -- last week was a week off for the harvest. It's a nice, but small, assortment. I got maybe a cup of raspberries (that won't last twelve hours), a few radishes, one nice kolrabi, a humongous zucchini (which is not very flavorful, but will provide bulk to stew or omelette or something), a nice bunch of onions, a small amount of chard -- also a nice amount on a week when Cathy and Kivi are out of town, a bag (maybe six ounces) of spinach and another of mixed greens and two big bags of kale. Apparently the box was supposed to have just one but they had an extra and knew from previous conversations that I like kale, so they gave it to me. Booyah!